빠르게 시작하기
React 문서에 오신 것을 환영합니다! 이 페이지에서는 여러분이 매일 사용하게 될 React 개념의 80%를 소개합니다.
학습 내용
- 컴포넌트를 만들고 중첩하는 방법
- 마크업과 스타일을 추가하는 방법
- 데이터를 표시하는 방법
- 조건과 리스트를 렌더링하는 방법
- 이벤트에 응답하고 화면을 업데이트하는 방법
- 컴포넌트 간에 데이터를 공유하는 방법
컴포넌트 생성 및 중첩하기
React 앱은 컴포넌트로 구성됩니다. 컴포넌트는 고유한 로직과 모양을 가진 사용자 인터페이스UI의 일부입니다. 컴포넌트는 버튼만큼 작을 수도 있고 전체 페이지만큼 클 수도 있습니다.
React 컴포넌트는 마크업을 반환하는 자바스크립트 함수입니다.
function MyButton() {
  return (
    <button>I'm a button</button>
  );
}
이제 MyButton을 선언했으므로 다른 컴포넌트 안에 중첩할 수 있습니다.
export default function MyApp() {
  return (
    <div>
      <h1>Welcome to my app</h1>
      <MyButton />
    </div>
  );
}
<MyButton />이 대문자로 시작하는 것을 주목해 주세요. 이것이 바로 React 컴포넌트임을 알 수 있는 방법입니다. React 컴포넌트의 이름은 항상 대문자로 시작해야 하고 HTML 태그는 소문자로 시작해야 합니다.
결과를 확인해 보세요.
function MyButton() {
  return (
    <button>
      I'm a button
    </button>
  );
}

export default function MyApp() {
  return (
    <div>
      <h1>Welcome to my app</h1>
      <MyButton />
    </div>
  );
}
export default 키워드는 파일의 기본 컴포넌트를 지정합니다. 자바스크립트 문법에 익숙하지 않다면 MDN과 javascript.info를 참고해 주세요.
JSX로 마크업 작성하기
위에서 본 마크업 문법을 JSX라고 합니다. 이것은 선택 사항이지만 대부분의 React 프로젝트는 편의성을 위해 JSX를 사용합니다. 로컬 개발에 권장하는 모든 도구는 JSX를 기본적으로 지원합니다.
JSX는 HTML보다 엄격합니다. JSX에서는 <br />같이 태그를 닫아야 합니다. 또한 컴포넌트는 여러 개의 JSX 태그를 반환할 수 없습니다. <div>...</div> 또는 빈 <>...</> 래퍼와 같이 공유되는 부모로 감싸야 합니다.
function AboutPage() {
  return (
    <>
      <h1>About</h1>
      <p>Hello there.<br />How do you do?</p>
    </>
  );
}
JSX로 변환할 HTML이 많은 경우 온라인 변환기를 사용할 수 있습니다.
스타일 추가하기
React에서는 className으로 CSS 클래스를 지정합니다. 이것은 HTML의 class 어트리뷰트와 동일한 방식으로 동작합니다.
<img className="avatar" />그 다음 별도의 CSS 파일에 해당 CSS 규칙을 작성합니다.
/* In your CSS */
.avatar {
  border-radius: 50%;
}
React는 CSS 파일을 추가하는 방법을 규정하지 않습니다. 가장 간단한 방법은 HTML에 <link> 태그를 추가하는 것입니다. 빌드 도구나 프레임워크를 사용하는 경우 해당 문서를 참고하여 프로젝트에 CSS 파일을 추가하는 방법을 알아보세요.
데이터 표시하기
JSX를 사용하면 자바스크립트에 마크업을 넣을 수 있습니다. 중괄호를 사용하면 코드에서 일부 변수를 삽입하여 사용자에게 표시할 수 있도록 자바스크립트로 “이스케이프 백Escape Back” 할 수 있습니다. 아래의 예시는 user.name을 표시합니다.
return (
  <h1>
    {user.name}
  </h1>
);
JSX 어트리뷰트에서 따옴표 대신 중괄호를 사용하여 “자바스크립트로 이스케이프Escape Into JavaScript” 할 수도 있습니다. 예를 들어 className="avatar"는 "avatar" 문자열을 CSS로 전달하지만 src={user.imageUrl}는 자바스크립트 user.imageUrl 변수 값을 읽은 다음 해당 값을 src 어트리뷰트로 전달합니다.
return (
  <img
    className="avatar"
    src={user.imageUrl}
  />
);
JSX 중괄호 안에 문자열 연결과 같이 더 복잡한 표현식을 넣을 수도 있습니다.
const user = {
  name: 'Hedy Lamarr',
  imageUrl: 'https://react.dev/images/docs/scientists/yXOvdOSs.jpg',
  imageSize: 90,
};

export default function Profile() {
  return (
    <>
      <h1>{user.name}</h1>
      <img
        className="avatar"
        src={user.imageUrl}
        alt={'Photo of ' + user.name}
        style={{
          width: user.imageSize,
          height: user.imageSize
        }}
      />
    </>
  );
}
위의 예시에서 style={{}}은 특별한 문법이 아니라 style={ } JSX 중괄호 안에 있는 일반 {} 객체입니다. 스타일이 자바스크립트 변수에 의존하는 경우 style 어트리뷰트를 사용할 수 있습니다.
조건부 렌더링
React에서 조건문을 작성하는 데에는 특별한 문법이 필요 없습니다. 일반적인 자바스크립트 코드를 작성할 때 사용하는 것과 동일한 방법을 사용합니다. 예를 들어 if 문을 사용하여 조건부로 JSX를 포함할 수 있습니다.
let content;
if (isLoggedIn) {
  content = <AdminPanel />;
} else {
  content = <LoginForm />;
}
return (
  <div>
    {content}
  </div>
);
더욱 간결한 코드를 원한다면 조건부 삼항 연산자를 사용할 수 있습니다. 이것은 if 문과 달리 JSX 내부에서 동작합니다.
<div>
  {isLoggedIn ? (
    <AdminPanel />
  ) : (
    <LoginForm />
  )}
</div>
else 분기가 필요하지 않으면 더 짧은 && 연산자를 사용할 수도 있습니다.
<div>
  {isLoggedIn && <AdminPanel />}
</div>
이러한 접근 방식은 어트리뷰트를 조건부로 지정할 때도 동작합니다. 이러한 자바스크립트 문법에 익숙하지 않다면 항상 if...else를 사용하는 것으로 시작할 수 있습니다.
리스트 렌더링하기
컴포넌트 리스트를 렌더링하기 위해서는 for 문 및 map() 함수와 같은 자바스크립트 기능을 사용합니다.
예를 들어 여러 제품이 있다고 가정하겠습니다.
const products = [
  { title: 'Cabbage', id: 1 },
  { title: 'Garlic', id: 2 },
  { title: 'Apple', id: 3 },
];
컴포넌트 내에서 map() 함수를 사용하여 제품 배열을 <li> 항목 배열로 변환합니다.
const listItems = products.map(product =>
  <li key={product.id}>
    {product.title}
  </li>
);

return (
  <ul>{listItems}</ul>
);<li>에 key 어트리뷰트가 있는 것을 주목하세요. 목록의 각 항목에 대해, 형제 항목 사이에서 해당 항목을 고유하게 식별하는 문자열 또는 숫자를 전달해야 합니다. React는 나중에 항목을 삽입, 삭제 또는 재정렬할 때 어떤 일이 일어났는지 알기 위해 key를 사용합니다.
const products = [
  { title: 'Cabbage', isFruit: false, id: 1 },
  { title: 'Garlic', isFruit: false, id: 2 },
  { title: 'Apple', isFruit: true, id: 3 },
];

export default function ShoppingList() {
  const listItems = products.map(product =>
    <li
      key={product.id}
      style={{
        color: product.isFruit ? 'magenta' : 'darkgreen'
      }}
    >
      {product.title}
    </li>
  );

  return (
    <ul>{listItems}</ul>
  );
}
이벤트에 응답하기
컴포넌트 내부에 이벤트 핸들러 함수를 선언하여 이벤트에 응답할 수 있습니다.
function MyButton() {
  function handleClick() {
    alert('You clicked me!');
  }

  return (
    <button onClick={handleClick}>
      Click me
    </button>
  );
}onClick={handleClick}의 끝에 소괄호(())가 없는 것을 주목하세요! 이벤트 핸들러 함수를 호출하지 않고 전달만 하면 됩니다. React는 사용자가 버튼을 클릭할 때 이벤트 핸들러를 호출합니다.
화면 업데이트하기
컴포넌트가 특정 정보를 “기억”하여 표시하기를 원하는 경우가 종종 있습니다. 예를 들어 버튼이 클릭된 횟수를 세고 싶을 수 있습니다. 이렇게 하려면 컴포넌트에 State를 추가하면 됩니다.
먼저, React에서 useState를 가져옵니다.
import { useState } from 'react';이제 컴포넌트 내부에 State 변수를 선언할 수 있습니다.
function MyButton() {
  const [count, setCount] = useState(0);
// ...useState로부터 현재 State (count)와 이를 업데이트할 수 있는 함수 (setCount)를 얻을 수 있습니다. 이들을 어떤 이름으로도 지정할 수 있지만 [something, setSomething]으로 작성하는 것이 일반적입니다.
버튼이 처음 표시될 때는 useState()에 0을 전달했기 때문에 count가 0이 됩니다. State를 변경하고 싶다면 setCount()를 실행하고 새 값을 전달하세요. 이 버튼을 클릭하면 카운터가 증가합니다.
function MyButton() {
  const [count, setCount] = useState(0);

  function handleClick() {
    setCount(count + 1);
  }

  return (
    <button onClick={handleClick}>
      Clicked {count} times
    </button>
  );
}
React가 컴포넌트 함수를 다시 호출합니다. 이번에는 count가 1이 되고, 그 다음에는 2가 될 것입니다. 이런 방식입니다.
같은 컴포넌트를 여러 번 렌더링하면 각각의 컴포넌트는 고유한 State를 얻게 됩니다. 각 버튼을 개별적으로 클릭해 보세요.
import { useState } from 'react';

export default function MyApp() {
  return (
    <div>
      <h1>Counters that update separately</h1>
      <MyButton />
      <MyButton />
    </div>
  );
}

function MyButton() {
  const [count, setCount] = useState(0);

  function handleClick() {
    setCount(count + 1);
  }

  return (
    <button onClick={handleClick}>
      Clicked {count} times
    </button>
  );
}
각 버튼이 고유한 count State를 “기억”하고 다른 버튼에 영향을 주지 않는 방식에 주목해 주세요.
Hook 사용하기
use로 시작하는 함수를 Hook이라고 합니다. useState는 React에서 제공하는 내장 Hook입니다. 다른 내장 Hook은 API 참고서에서 찾아볼 수 있습니다. 또한 기존의 것들을 조합하여 자신만의 Hook을 작성할 수도 있습니다.
Hook은 다른 함수보다 더 제한적입니다. 컴포넌트(또는 다른 Hook)의 상단에서만 Hook을 호출할 수 있습니다. 조건이나 반복에서 useState를 사용하고 싶다면 새 컴포넌트를 추출하여 그곳에 넣으세요.
컴포넌트 간에 데이터 공유하기
이전 예시에서는 각각의 MyButton에 독립적인 count가 있었고, 각 버튼을 클릭하면 클릭한 버튼의 count만 변경되었습니다.
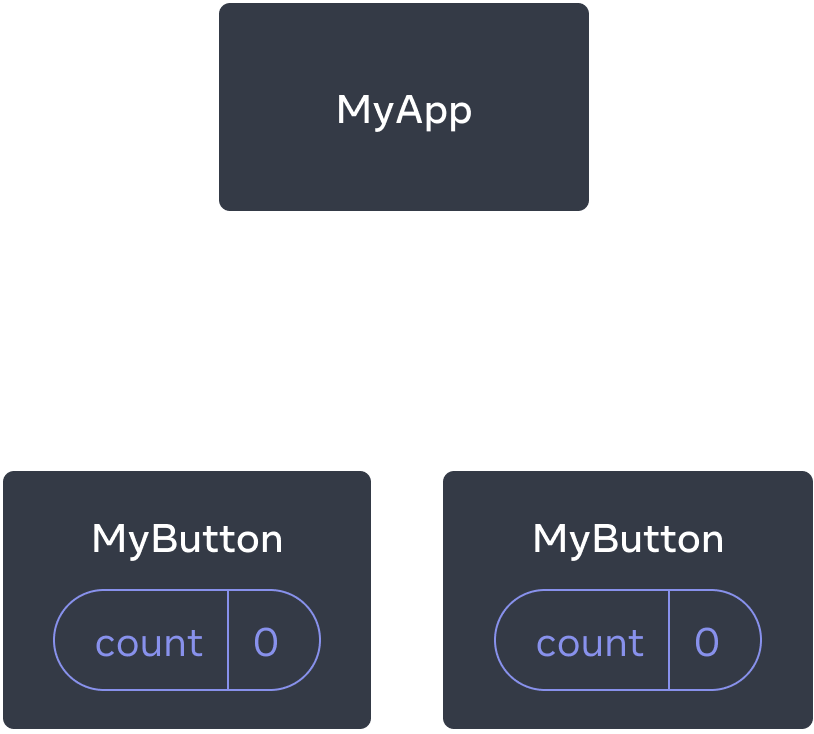
처음에 각 MyButton의 count State는 0입니다.
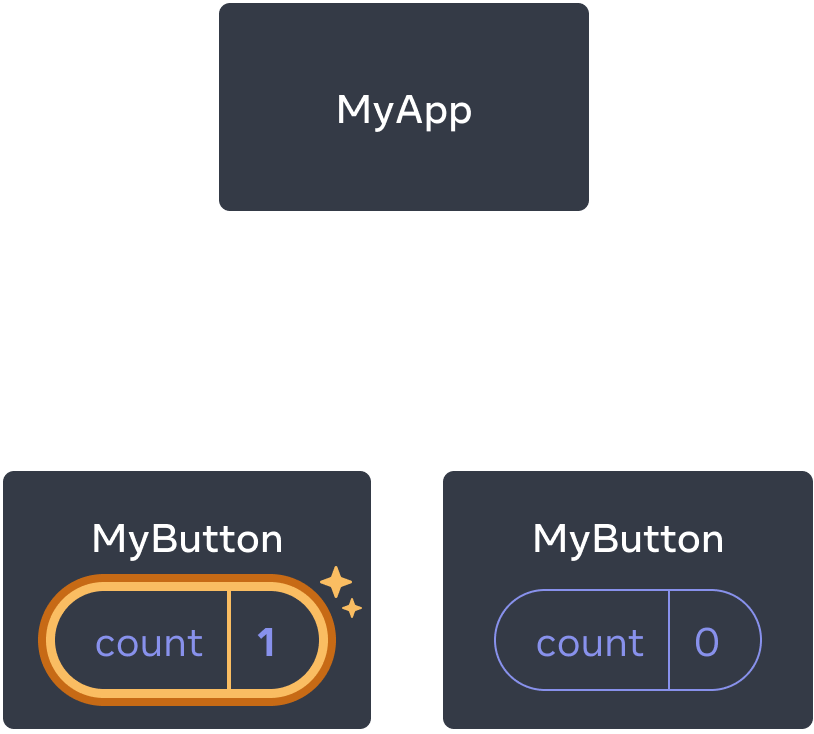
첫 번째 MyButton이 count를 1로 업데이트합니다.
하지만 데이터를 공유하고 항상 함께 업데이트하기 위한 컴포넌트가 필요한 경우가 많습니다.
두 MyButton 컴포넌트가 동일한 count를 표시하고 함께 업데이트하려면, State를 개별 버튼에서 모든 버튼이 포함된 가장 가까운 컴포넌트로 “위쪽”으로 이동해야 합니다.
이 예시에서는 MyApp입니다.


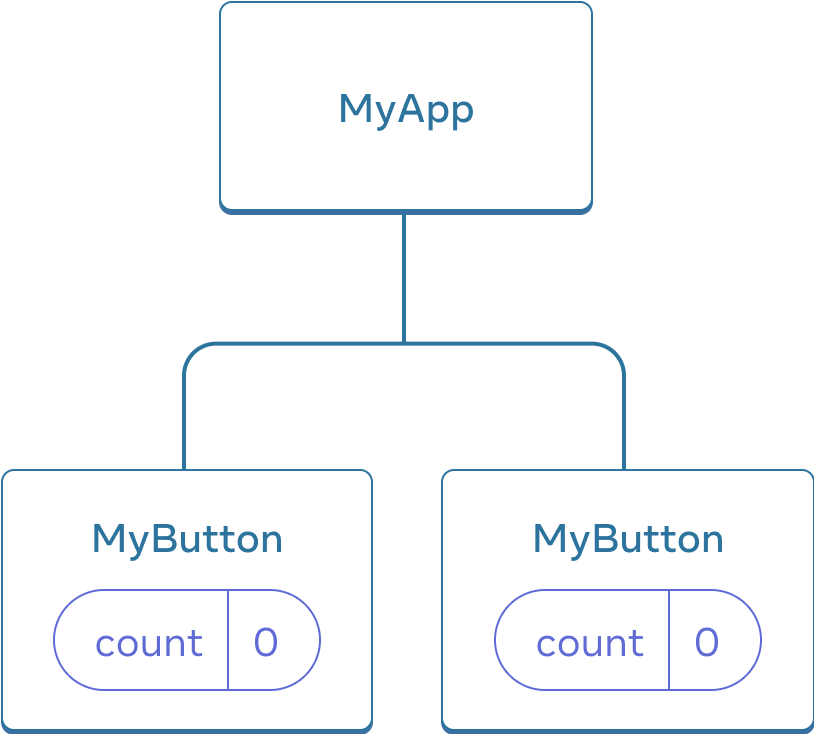
처음에 MyApp의 count State는 0이며 두 자식에게 모두 전달합니다.
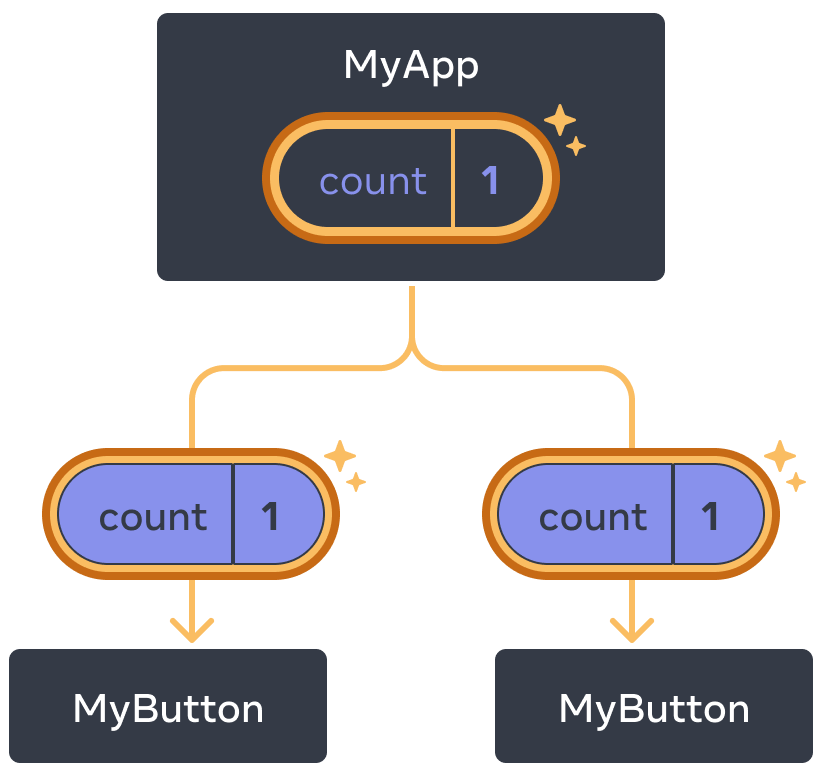
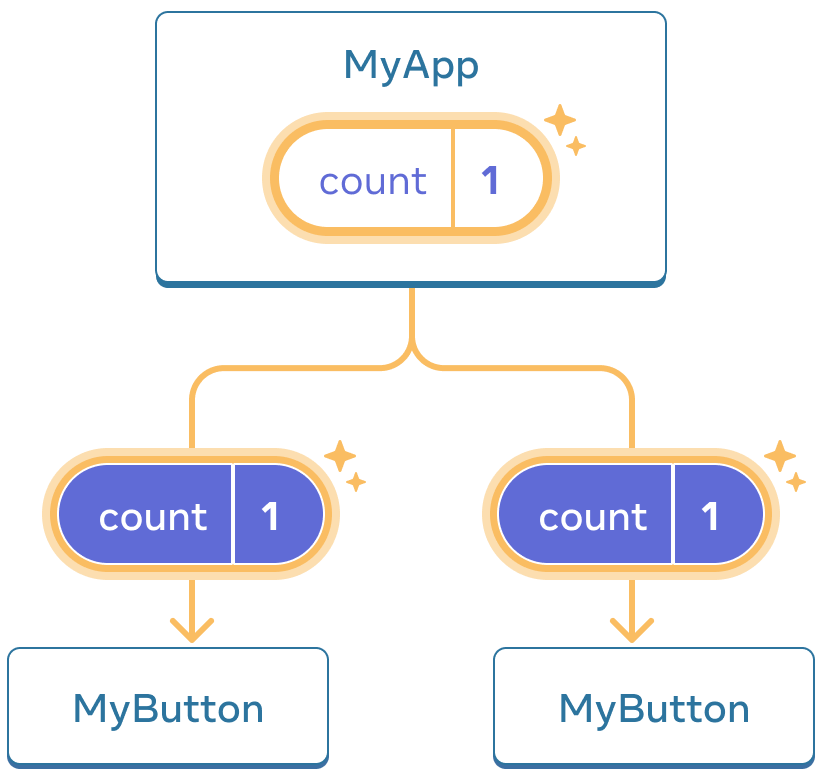
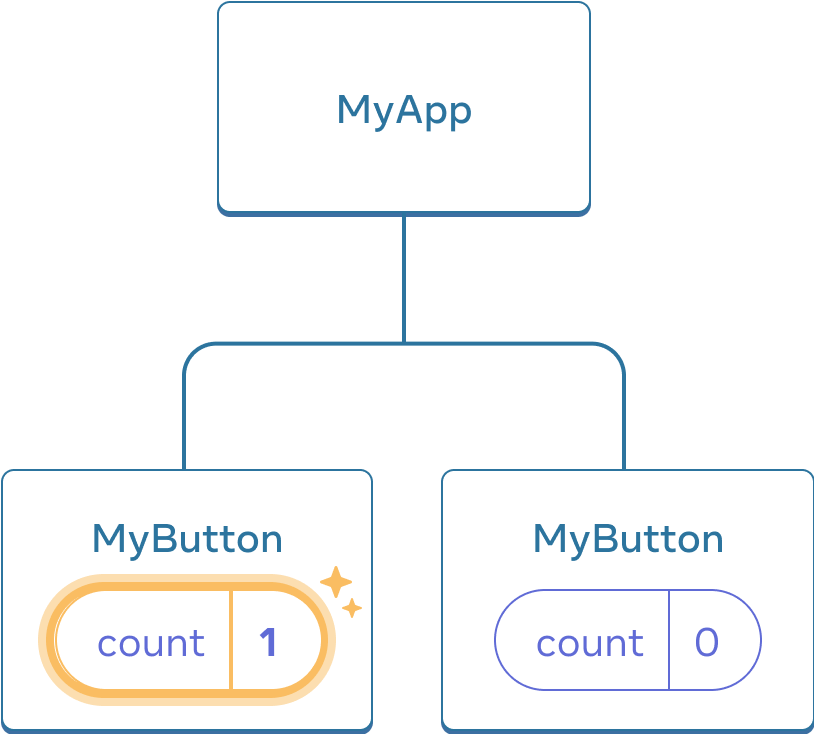
클릭 시 MyApp은 count State를 1로 업데이트하고 두 자식에게 전달합니다.
이제 두 버튼 중 하나를 클릭하면 MyApp의 count가 변경되어 MyButton의 카운트가 모두 변경됩니다. 이를 코드로 표현하는 방법은 다음과 같습니다.
먼저 MyButton에서 MyApp으로 State를 위로 이동합니다.
export default function MyApp() {
  const [count, setCount] = useState(0);

  function handleClick() {
    setCount(count + 1);
  }

  return (
    <div>
      <h1>Counters that update separately</h1>
      <MyButton />
      <MyButton />
    </div>
  );
}

function MyButton() {
  // ... we're moving code from here ...
}
그 다음 공유된 클릭 핸들러와 함께 MyApp에서 각 MyButton으로 State를 전달합니다. 이전에 <img>와 같은 기본 제공 태그를 사용했던 것처럼 JSX 중괄호를 사용하여 MyButton에 정보를 전달할 수 있습니다.
export default function MyApp() {
  const [count, setCount] = useState(0);

  function handleClick() {
    setCount(count + 1);
  }

  return (
    <div>
      <h1>Counters that update together</h1>
      <MyButton count={count} onClick={handleClick} />
      <MyButton count={count} onClick={handleClick} />
    </div>
  );
}
이렇게 전달한 정보를 Props라고 합니다. 이제 MyApp 컴포넌트는 count State와 handleClick 이벤트 핸들러를 포함하며, 이 두 가지를 각 버튼에 Props로 전달합니다.
마지막으로 부모 컴포넌트에서 전달한 Props를 읽도록 MyButton을 변경합니다.
function MyButton({ count, onClick }) {
  return (
    <button onClick={onClick}>
      Clicked {count} times
    </button>
  );
}
버튼을 클릭하면 onClick 핸들러가 실행됩니다. 각 버튼의 onClick Prop는 MyApp 내부의 handleClick 함수로 설정되었으므로 그 안에 있는 코드가 실행됩니다. 이 코드는 setCount(count + 1)를 실행하여 count State 변수를 증가시킵니다. 새로운 count 값은 각 버튼에 Prop로 전달되므로 모든 버튼에는 새로운 값이 표시됩니다. 이를 “State 끌어올리기”라고 합니다. State를 위로 이동함으로써 컴포넌트 간에 State를 공유하게 됩니다.
import { useState } from 'react';

export default function MyApp() {
  const [count, setCount] = useState(0);

  function handleClick() {
    setCount(count + 1);
  }

  return (
    <div>
      <h1>Counters that update together</h1>
      <MyButton count={count} onClick={handleClick} />
      <MyButton count={count} onClick={handleClick} />
    </div>
  );
}

function MyButton({ count, onClick }) {
  return (
    <button onClick={onClick}>
      Clicked {count} times
    </button>
  );
}