State를 보존하고 초기화하기
각 컴포넌트는 독립된 State를 가집니다. React는 UI 트리에서의 위치를 통해 각 State가 어떤 컴포넌트에 속하는지 추적합니다. 리렌더링마다 언제 State를 보존하고 또 State를 초기화할지 컨트롤할 수 있습니다.
학습 내용
- React가 언제 State를 보존하고 언제 초기화하는지
- 어떻게 React가 컴포넌트의 State를 초기화하도록 강제할 수 있는지
- key와 타입이 State 보존에 어떻게 영향을 주는지
State는 렌더트리의 위치에 연결 됩니다.
React는 UI 안에 있는 컴포넌트 구조로 렌더 트리를 만듭니다.
컴포넌트에 State를 줄 때 State가 컴포넌트 안에 “살고” 있다고 생각할 수도 있습니다. 하지만 사실 State는 React 안에 있습니다. React는 컴포넌트가 UI 트리에 있는 위치를 이용해 React가 가지고 있는 각 State를 알맞은 컴포넌트와 연결합니다.
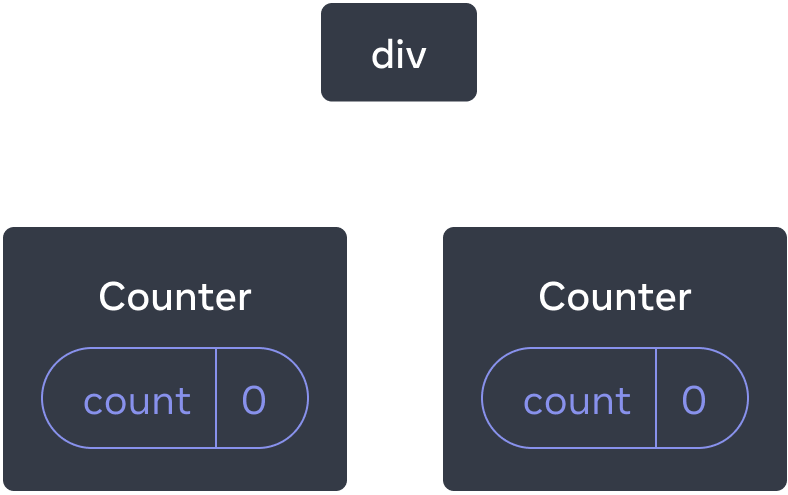
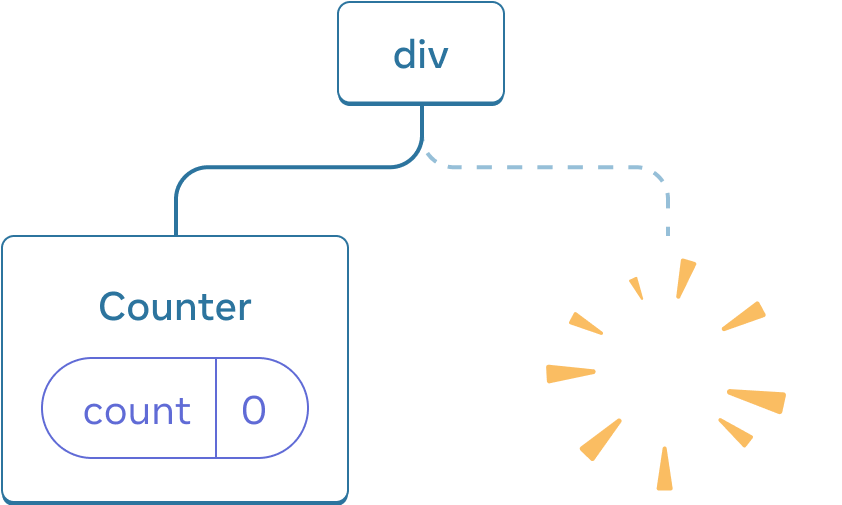
여기 동일한 <Counter /> JSX 태그가 다른 두 군데에서 렌더링되고 있습니다.
import { useState } from 'react';

export default function App() {
  const counter = <Counter />;
  return (
    <div>
      {counter}
      {counter}
    </div>
  );
}

function Counter() {
  const [score, setScore] = useState(0);
  const [hover, setHover] = useState(false);

  let className = 'counter';
  if (hover) {
    className += ' hover';
  }

  return (
    <div
      className={className}
      onPointerEnter={() => setHover(true)}
      onPointerLeave={() => setHover(false)}
    >
      <h1>{score}</h1>
      <button onClick={() => setScore(score + 1)}>
        Add one
      </button>
    </div>
  );
}
카운터가 다음과 같이 트리 구조로 보입니다.
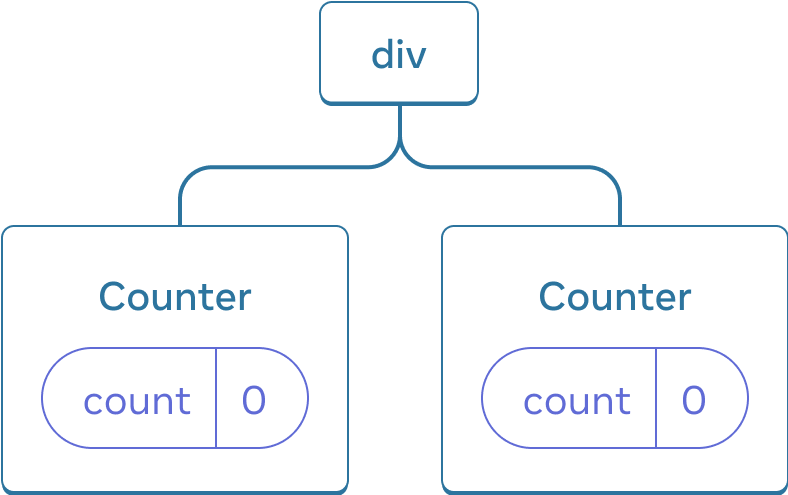
React tree
이 둘은 각각 트리에서 자기 고유의 위치에 렌더링되어 있으므로 분리되어 있는 카운터입니다. 일반적으로 React를 사용할 때 위치에 대해 생각할 필요는 없지만 React가 어떻게 작동하는지 이해할 때 유용합니다.
React에서 화면의 각 컴포넌트는 완전히 분리된 State를 가집니다. 예를 들어, 두 Counter 컴포넌트를 나란히 렌더링하면 그들은 각각 자신만의 독립된 score과 hover State를 가지게 됩니다.
두 카운터를 클릭해보고 서로 영향을 끼치지 않는 것을 확인해보세요.
import { useState } from 'react';

export default function App() {
  return (
    <div>
      <Counter />
      <Counter />
    </div>
  );
}

function Counter() {
  const [score, setScore] = useState(0);
  const [hover, setHover] = useState(false);

  let className = 'counter';
  if (hover) {
    className += ' hover';
  }

  return (
    <div
      className={className}
      onPointerEnter={() => setHover(true)}
      onPointerLeave={() => setHover(false)}
    >
      <h1>{score}</h1>
      <button onClick={() => setScore(score + 1)}>
        Add one
      </button>
    </div>
  );
}
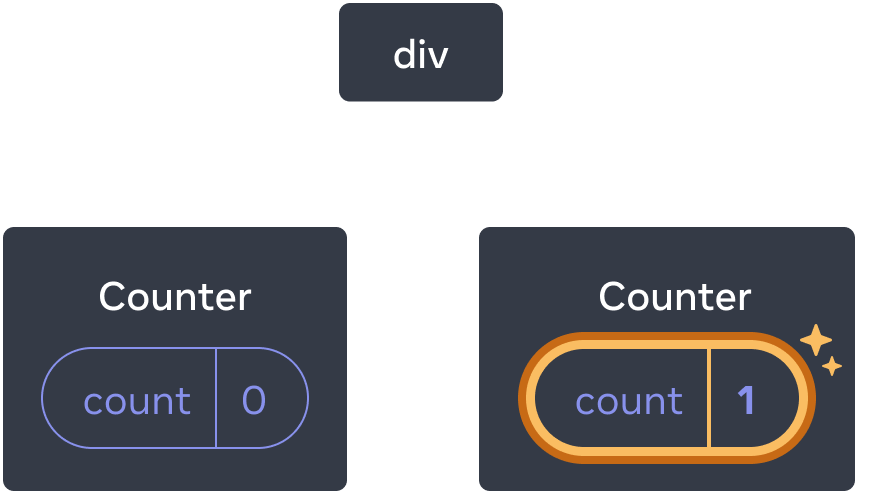
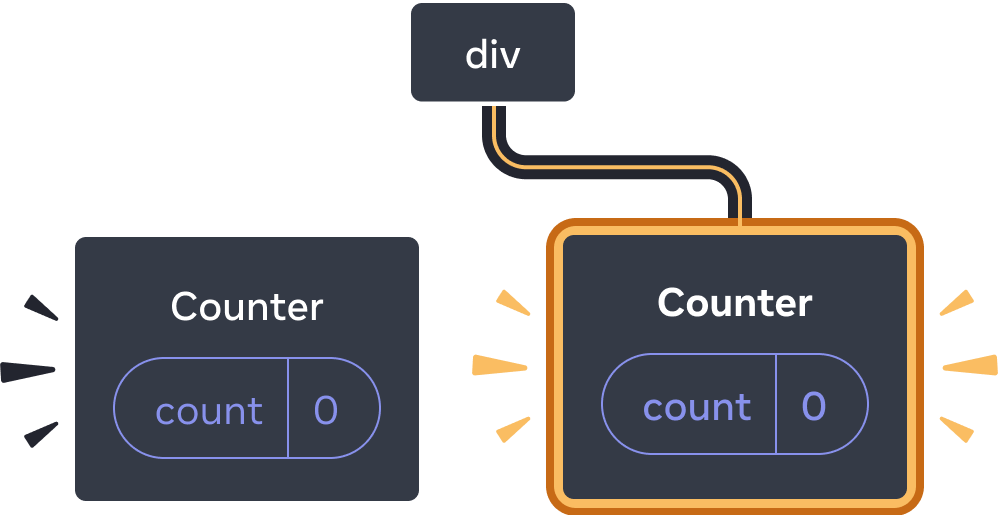
특정 카운터가 갱신되면, 해당 컴포넌트의 상태만 갱신되는 것을 확인할 수 있습니다.

Updating state
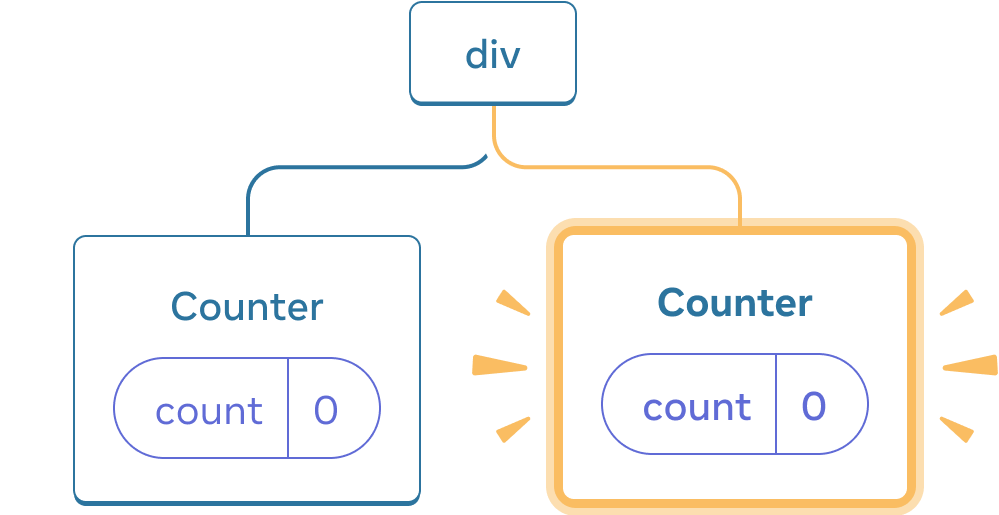
React는 트리의 동일한 컴포넌트를 동일한 위치에 렌더링하는 동안 상태를 유지합니다. 이를 확인하려면, 두 Counter를 모두 증가시키고, “Render the second counter” 체크박스의 체크를 해제하여 두 번째 컴포넌트를 제거해보세요. 그리고, 다시 체크박스를 눌러 추가해보세요.
import { useState } from 'react';

export default function App() {
  const [showB, setShowB] = useState(true);
  return (
    <div>
      <Counter />
      {showB && <Counter />}
      <label>
        <input
          type="checkbox"
          checked={showB}
          onChange={e => {
            setShowB(e.target.checked)
          }}
        />
        Render the second counter
      </label>
    </div>
  );
}

function Counter() {
  const [score, setScore] = useState(0);
  const [hover, setHover] = useState(false);

  let className = 'counter';
  if (hover) {
    className += ' hover';
  }

  return (
    <div
      className={className}
      onPointerEnter={() => setHover(true)}
      onPointerLeave={() => setHover(false)}
    >
      <h1>{score}</h1>
      <button onClick={() => setScore(score + 1)}>
        Add one
      </button>
    </div>
  );
}
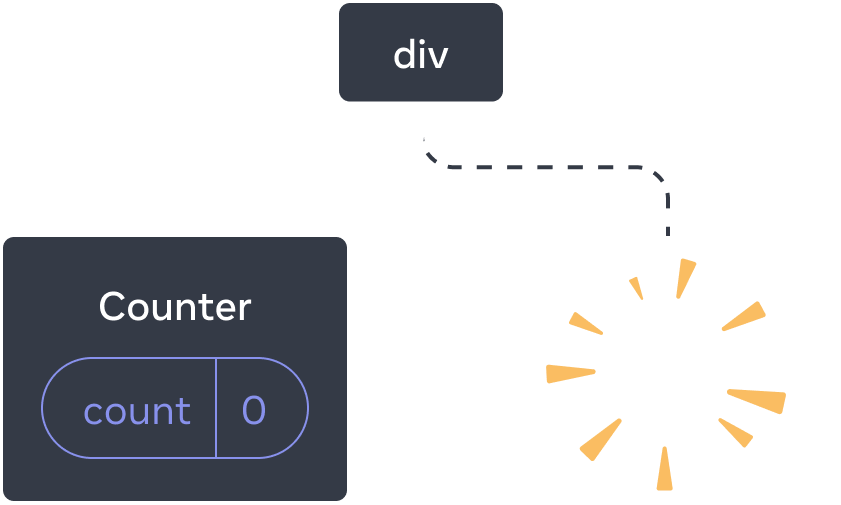
두 번째 카운터를 렌더링하지 않을 때 그 State가 완전히 사라지는 것을 확인해보세요. 이는 React가 컴포넌트를 제거할 때 그 State도 같이 제거하기 때문입니다.
Deleting a component
”Render the second counter”를 누를 때 두 번째 Counter와 그 State는 처음부터 초기화되고(score = 0) DOM에 추가됩니다.
Adding a component
React는 컴포넌트가 UI 트리에서 그 자리에 렌더링되는 한 State를 유지합니다. 만약 그것을 제거하거나 같은 자리에 다른 컴포넌트가 렌더링되면 React는 그 State를 버립니다.
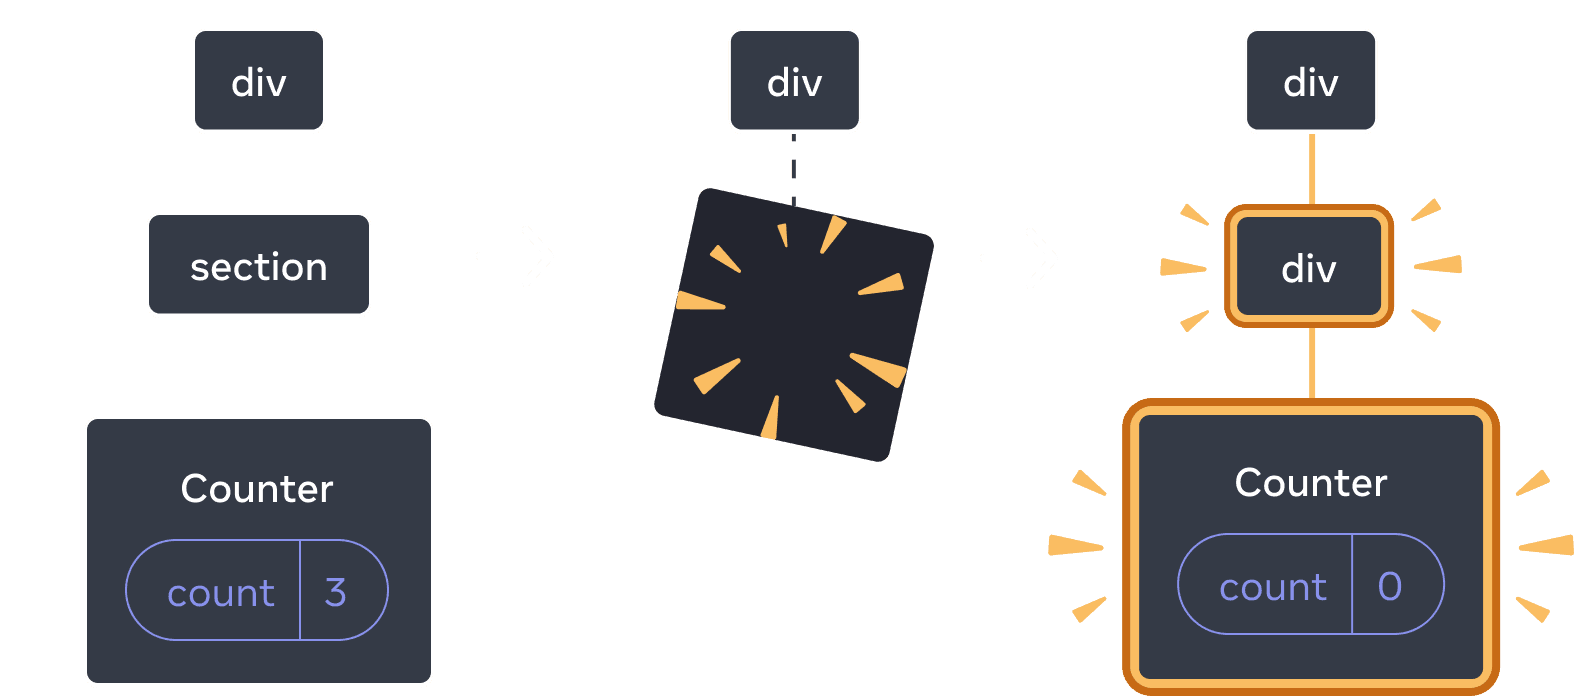
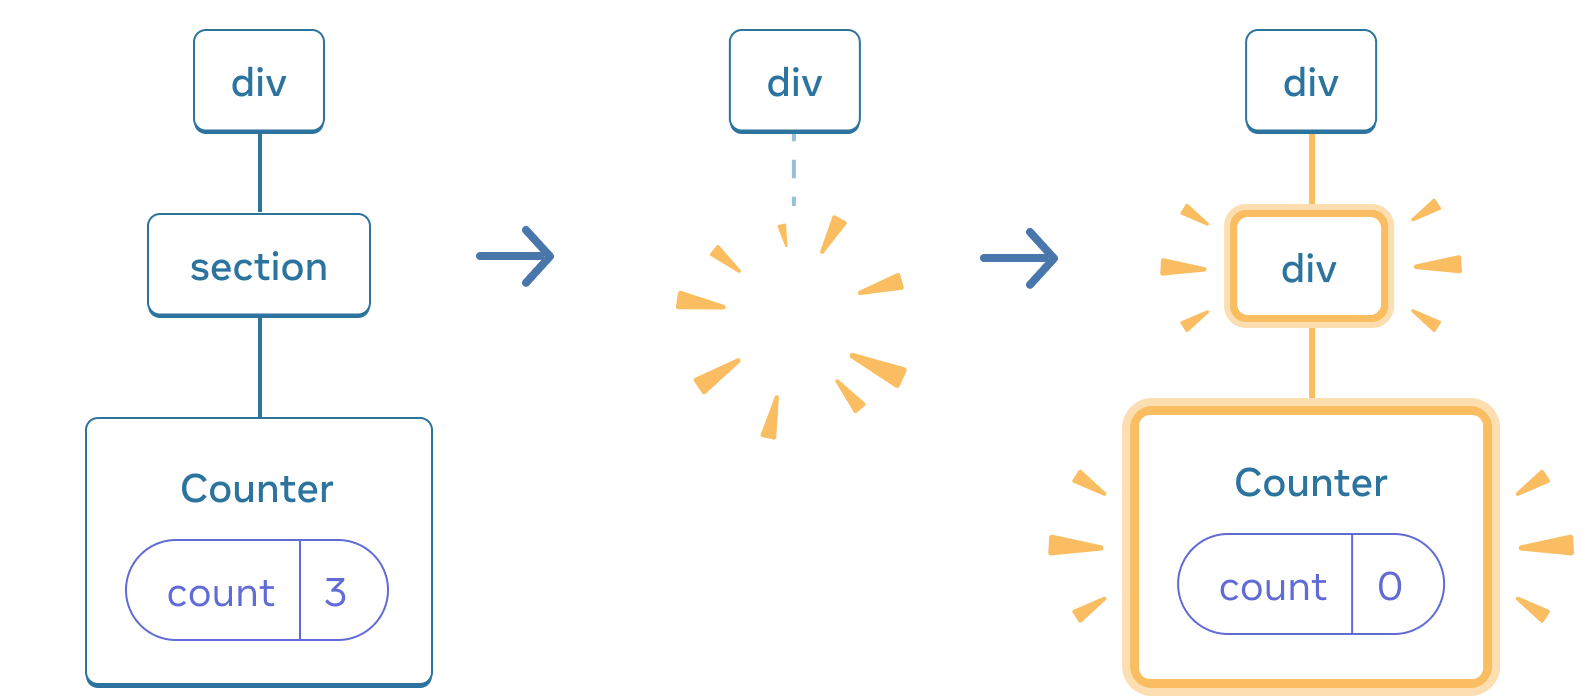
같은 자리의 같은 컴포넌트는 State를 보존합니다
다음 예시에는 서로 다른 두 <Counter /> 태그가 있습니다.
import { useState } from 'react';

export default function App() {
  const [isFancy, setIsFancy] = useState(false);
  return (
    <div>
      {isFancy ? (
        <Counter isFancy={true} />
      ) : (
        <Counter isFancy={false} />
      )}
      <label>
        <input
          type="checkbox"
          checked={isFancy}
          onChange={e => {
            setIsFancy(e.target.checked)
          }}
        />
        Use fancy styling
      </label>
    </div>
  );
}

function Counter({ isFancy }) {
  const [score, setScore] = useState(0);
  const [hover, setHover] = useState(false);

  let className = 'counter';
  if (hover) {
    className += ' hover';
  }
  if (isFancy) {
    className += ' fancy';
  }

  return (
    <div
      className={className}
      onPointerEnter={() => setHover(true)}
      onPointerLeave={() => setHover(false)}
    >
      <h1>{score}</h1>
      <button onClick={() => setScore(score + 1)}>
        Add one
      </button>
    </div>
  );
}
체크 박스를 선택하거나 선택 해제할 때 카운터 State는 초기화되지 않습니다. isFancy가 true이든 false이든 <Counter />는 같은 자리에 있습니다. root App 컴포넌트가 반환한 div의 첫 번째 자식으로 있죠.

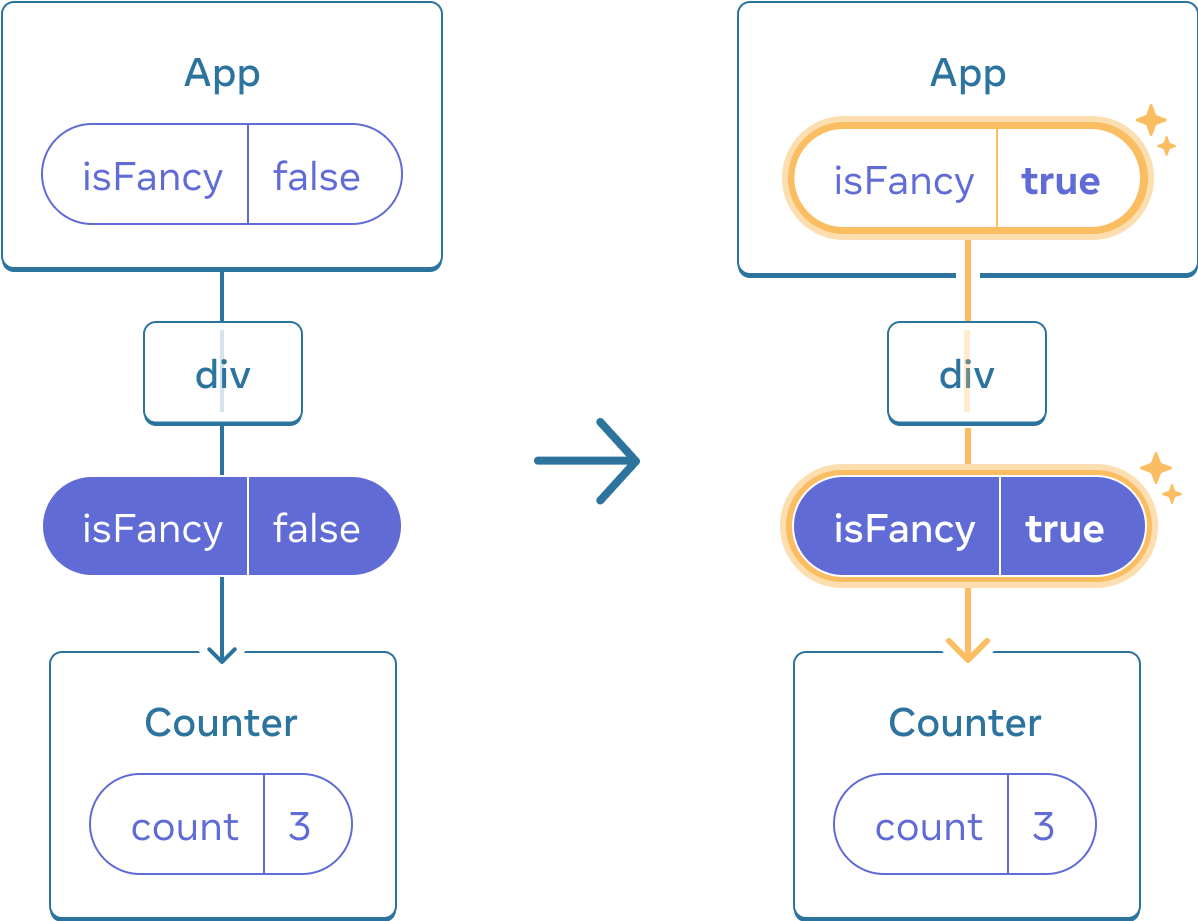
Counter는 같은 자리에 있기 때문에 App 상태의 갱신은 Counter를 초기화시키지 않습니다
첫 번째 자리의 같은 컴포넌트이기 때문에 React의 관점에서는 같은 카운터입니다.
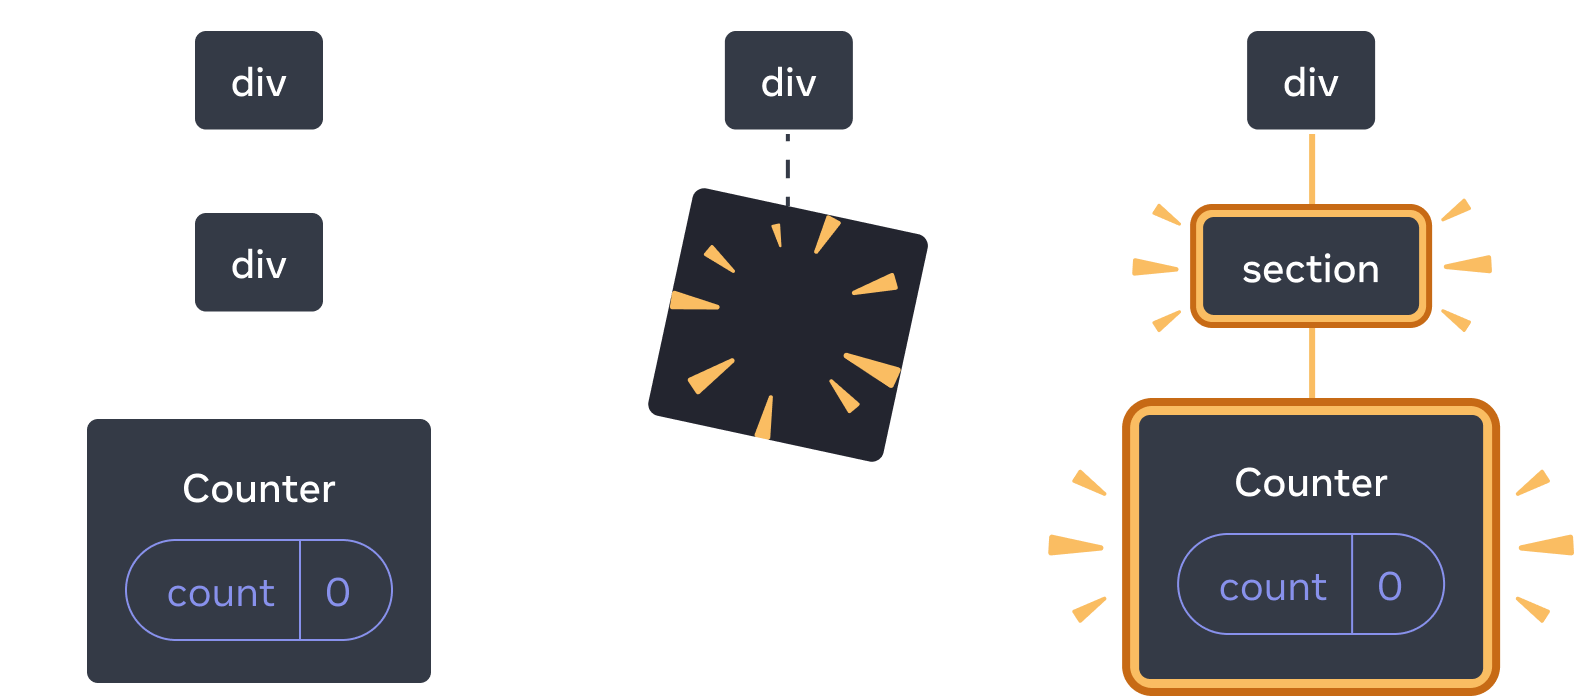
같은 위치의 다른 컴포넌트는 State를 초기화합니다
다음 예시에서 체크 박스를 선택하면 <Counter>가 <p>로 교체됩니다.
import { useState } from 'react';

export default function App() {
  const [isPaused, setIsPaused] = useState(false);
  return (
    <div>
      {isPaused ? (
        <p>See you later!</p>
      ) : (
        <Counter />
      )}
      <label>
        <input
          type="checkbox"
          checked={isPaused}
          onChange={e => {
            setIsPaused(e.target.checked)
          }}
        />
        Take a break
      </label>
    </div>
  );
}

function Counter() {
  const [score, setScore] = useState(0);
  const [hover, setHover] = useState(false);

  let className = 'counter';
  if (hover) {
    className += ' hover';
  }

  return (
    <div
      className={className}
      onPointerEnter={() => setHover(true)}
      onPointerLeave={() => setHover(false)}
    >
      <h1>{score}</h1>
      <button onClick={() => setScore(score + 1)}>
        Add one
      </button>
    </div>
  );
}
여기서 같은 자리의 다른 컴포넌트 타입으로 바꿉니다. 처음에는 <div>가 Counter를 갖고 있습니다. 하지만 p로 바꾸면 React는 UI 트리에서 Counter와 그 State를 제거합니다.
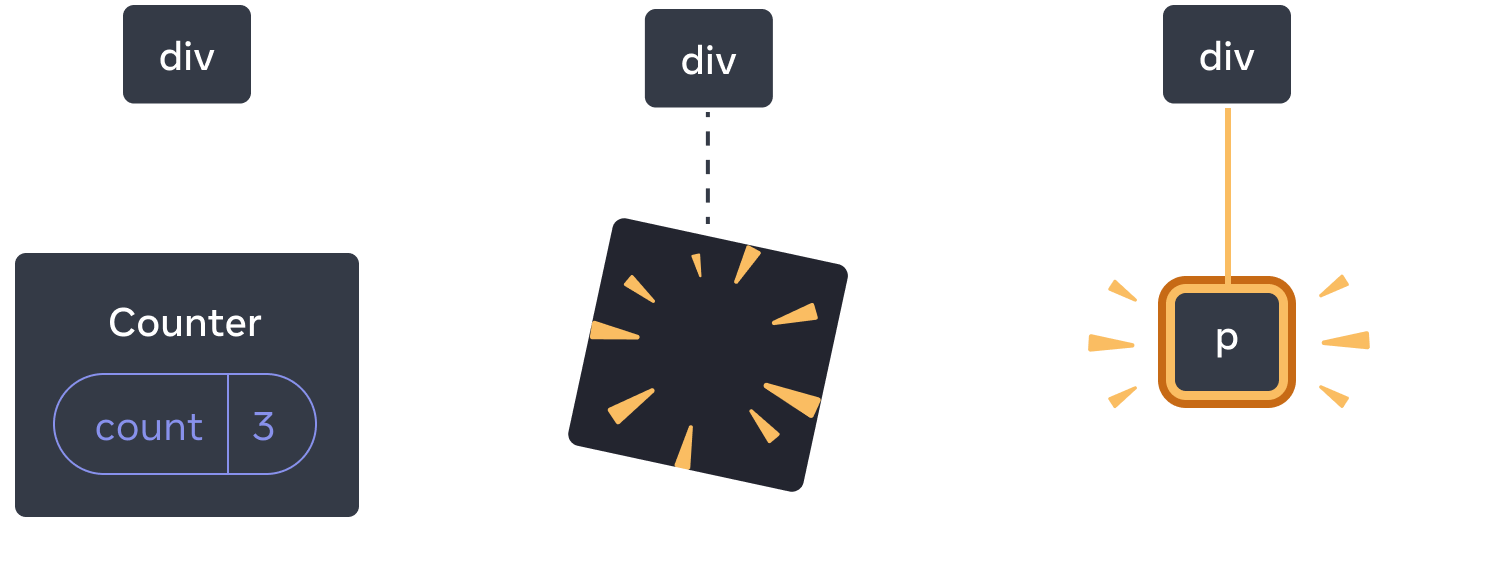
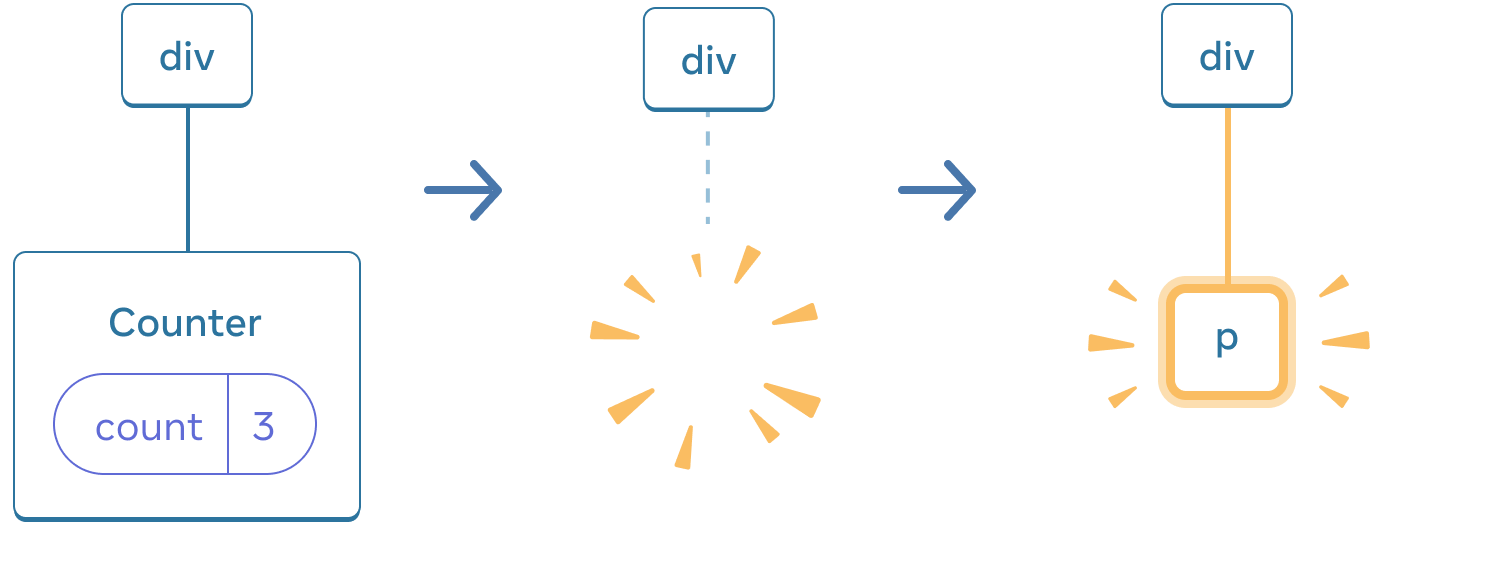
Counter 가 p 로 바뀌면, Counter 는 삭제되고 p 가 추가됩니다
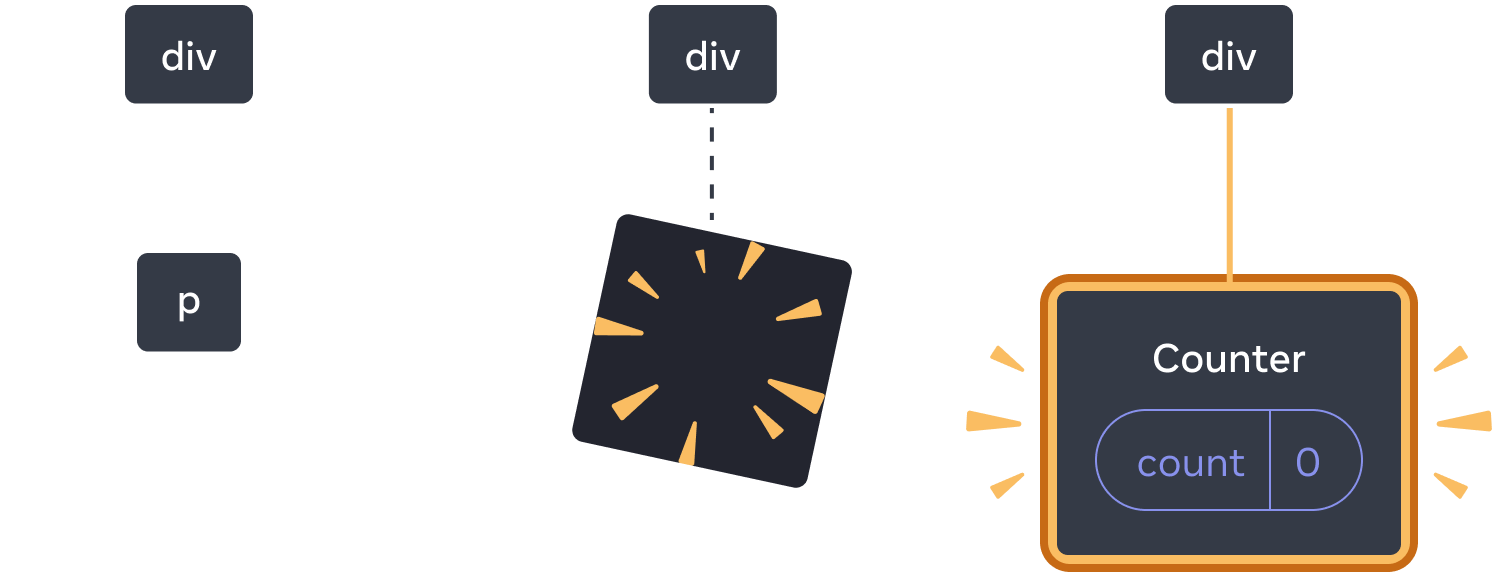
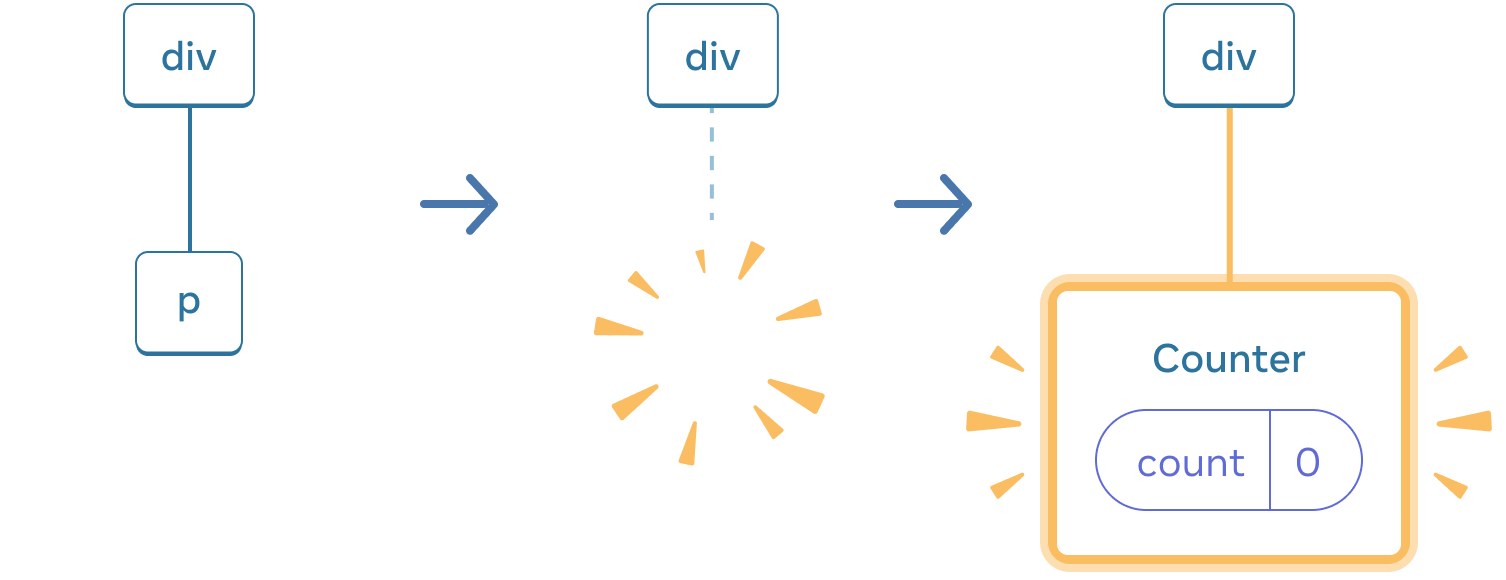
다시 되돌리면, p 는 삭제되고 Counter 가 추가됩니다.
또한 같은 위치에 다른 컴포넌트를 렌더링할 때 컴포넌트는 그의 전체 서브 트리의 State를 초기화합니다. 이것이 어떻게 작동하는지 보기 위해 카운터를 증가시키고 체크 박스를 체크해보세요.
import { useState } from 'react';

export default function App() {
  const [isFancy, setIsFancy] = useState(false);
  return (
    <div>
      {isFancy ? (
        <div>
          <Counter isFancy={true} />
        </div>
      ) : (
        <section>
          <Counter isFancy={false} />
        </section>
      )}
      <label>
        <input
          type="checkbox"
          checked={isFancy}
          onChange={e => {
            setIsFancy(e.target.checked)
          }}
        />
        Use fancy styling
      </label>
    </div>
  );
}

function Counter({ isFancy }) {
  const [score, setScore] = useState(0);
  const [hover, setHover] = useState(false);

  let className = 'counter';
  if (hover) {
    className += ' hover';
  }
  if (isFancy) {
    className += ' fancy';
  }

  return (
    <div
      className={className}
      onPointerEnter={() => setHover(true)}
      onPointerLeave={() => setHover(false)}
    >
      <h1>{score}</h1>
      <button onClick={() => setScore(score + 1)}>
        Add one
      </button>
    </div>
  );
}
Counter의 State는 체크 박스를 선택할 때 초기화됩니다. 비록 Counter를 렌더링하지만, div의 첫 번째 자식이 section에서 div로 바뀝니다. 자식 section이 DOM에서 제거되었을 때, 그 아래 전체 트리(Counter와 그 State를 포함하여)도 함께 제거됩니다.
section이 div로 바뀌면, section은 삭제되고 새로운 div가 추가됩니다.
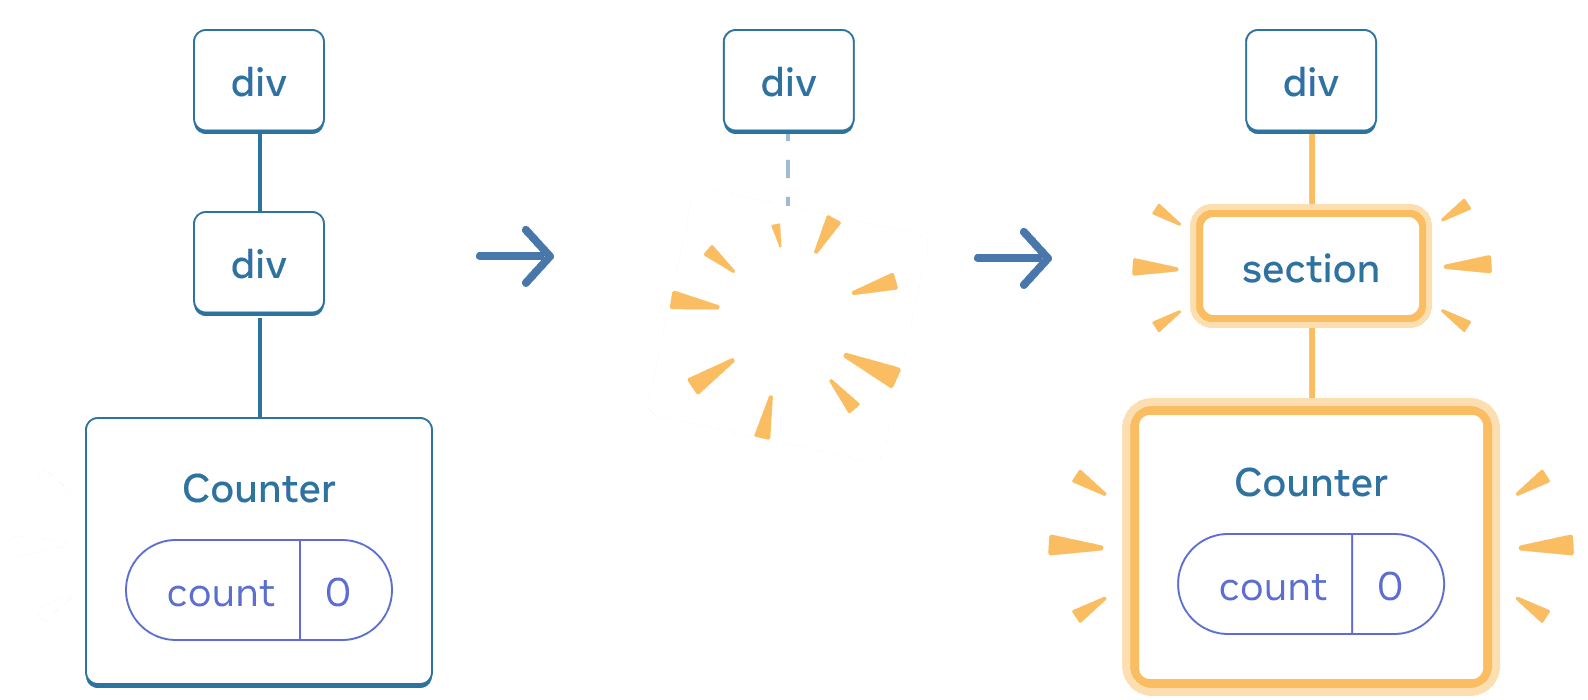
다시 되돌리면, div는 삭제되고 새로운 section이 추가됩니다.
경험상Rule of Thumb 리렌더링할 때 State를 유지하고 싶다면, 트리 구조가 “같아야” 합니다. 만약 구조가 다르다면 React가 트리에서 컴포넌트를 지울 때 State를 지우기 때문에 State가 유지되지 않습니다.
같은 위치에서 State를 초기화하기
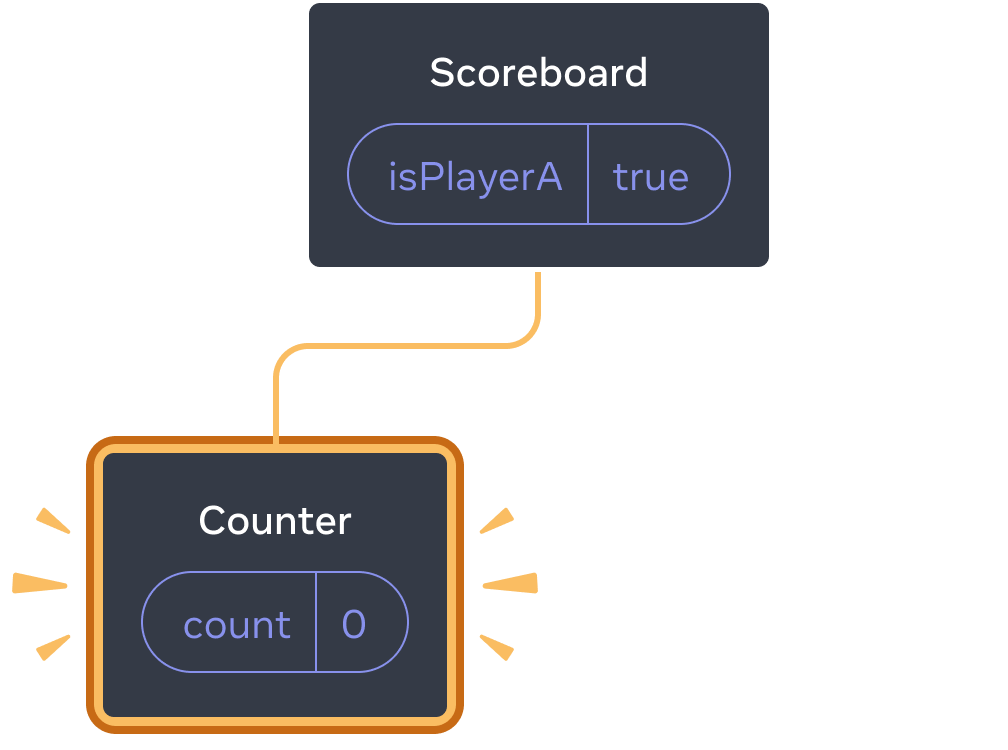
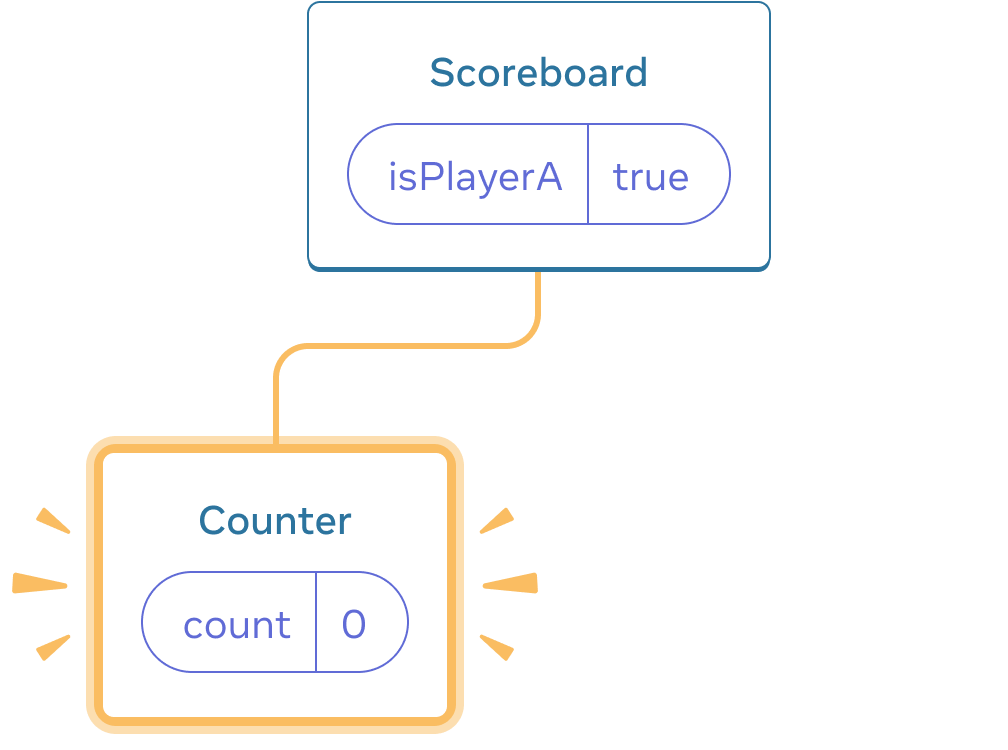
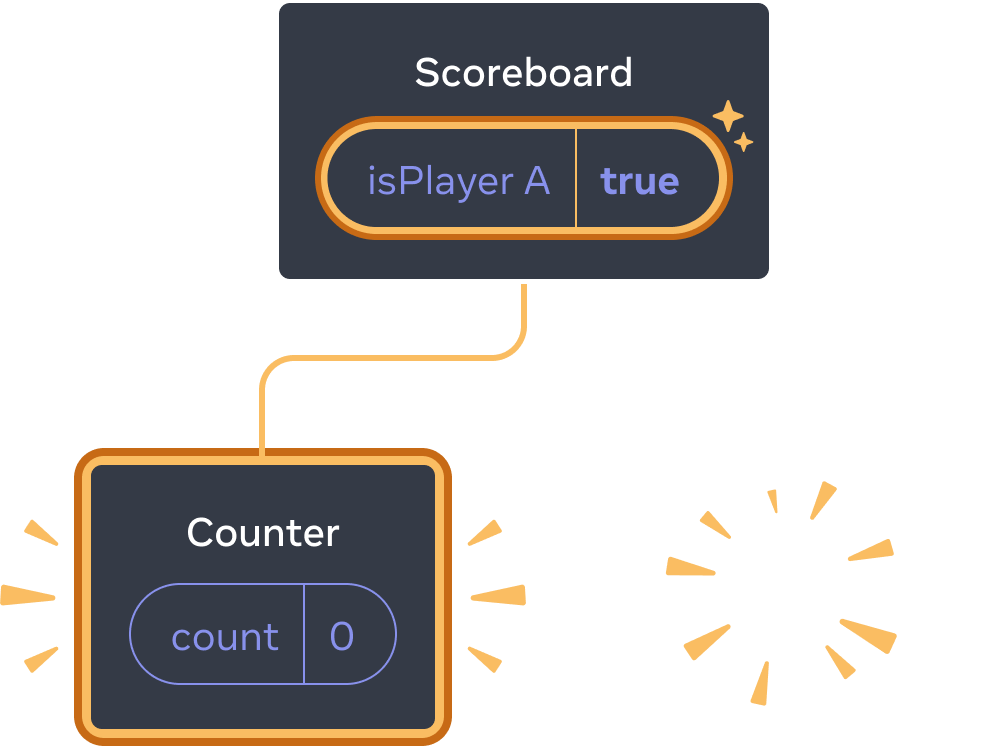
기본적으로 React는 컴포넌트가 같은 위치를 유지하면 State를 유지합니다. 보통 이것이 당신이 원하는 행동이기 때문에 기본 동작으로서 타당합니다. 그러나 가끔 컴포넌트 State를 초기화하고 싶을 때가 있습니다. 두 선수가 턴마다 자신의 점수를 추적하는 앱을 한번 봅시다.
import { useState } from 'react';

export default function Scoreboard() {
  const [isPlayerA, setIsPlayerA] = useState(true);
  return (
    <div>
      {isPlayerA ? (
        <Counter person="Taylor" />
      ) : (
        <Counter person="Sarah" />
      )}
      <button onClick={() => {
        setIsPlayerA(!isPlayerA);
      }}>
        Next player!
      </button>
    </div>
  );
}

function Counter({ person }) {
  const [score, setScore] = useState(0);
  const [hover, setHover] = useState(false);

  let className = 'counter';
  if (hover) {
    className += ' hover';
  }

  return (
    <div
      className={className}
      onPointerEnter={() => setHover(true)}
      onPointerLeave={() => setHover(false)}
    >
      <h1>{person}'s score: {score}</h1>
      <button onClick={() => setScore(score + 1)}>
        Add one
      </button>
    </div>
  );
}
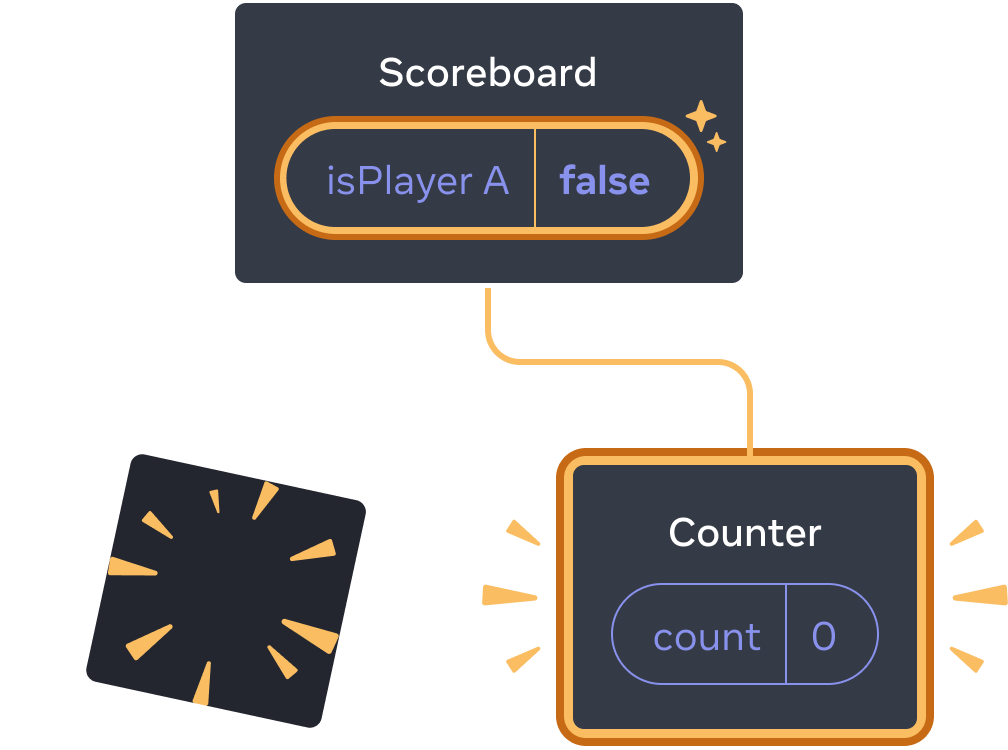
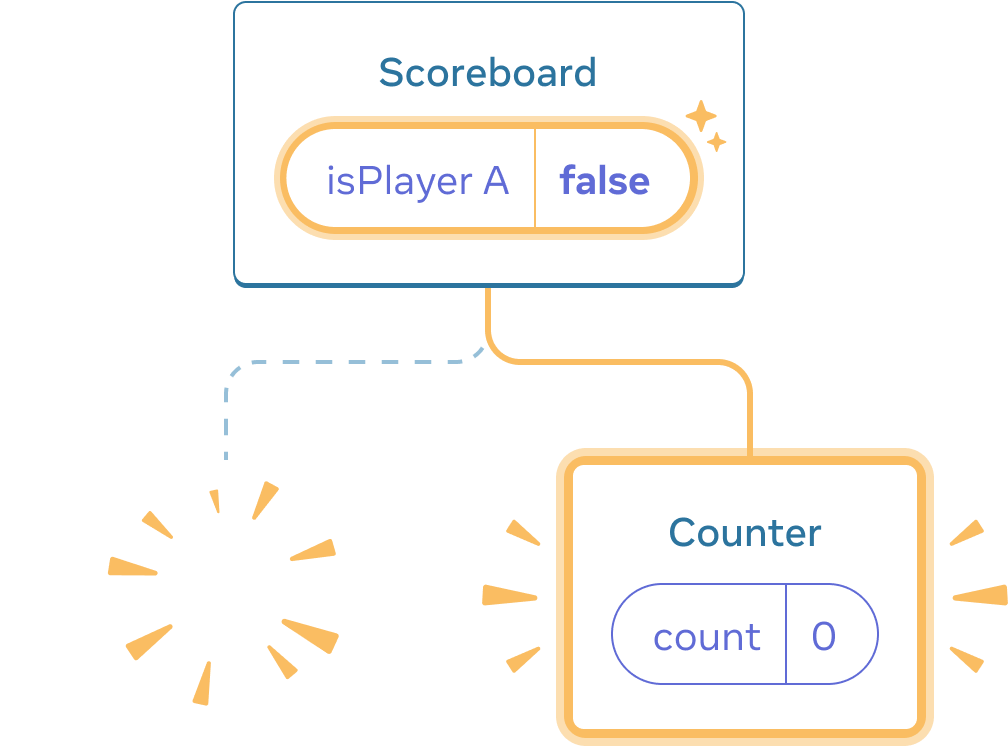
지금은 선수를 바꿀 때 점수가 유지됩니다. 두 Counter가 같은 위치에 나타나기 때문에 React는 그들을 person props가 변경된 같은 Counter로 봅니다.
하지만, 개념적으로 app에는 두 개의 분리된 카운터가 있어야 합니다. 그들은 UI에 같은 위치에 나타나지만, 하나는 Taylor의 카운터이고, 다른 하나는 Sarah의 카운터입니다.
이 둘을 바꿀 때 State를 초기화하기 위한 두 가지 방법이 있습니다.
- 다른 위치에 컴포넌트를 렌더링하기
- 각 컴포넌트에
key로 명시적인 식별자를 제공하기
선택지 1: 다른 위치에 컴포넌트를 렌더링하기
두 Counter가 독립적이기를 원한다면 둘을 다른 위치에 렌더링할 수 있습니다.
import { useState } from 'react';

export default function Scoreboard() {
  const [isPlayerA, setIsPlayerA] = useState(true);
  return (
    <div>
      {isPlayerA &&
        <Counter person="Taylor" />
      }
      {!isPlayerA &&
        <Counter person="Sarah" />
      }
      <button onClick={() => {
        setIsPlayerA(!isPlayerA);
      }}>
        Next player!
      </button>
    </div>
  );
}

function Counter({ person }) {
  const [score, setScore] = useState(0);
  const [hover, setHover] = useState(false);

  let className = 'counter';
  if (hover) {
    className += ' hover';
  }

  return (
    <div
      className={className}
      onPointerEnter={() => setHover(true)}
      onPointerLeave={() => setHover(false)}
    >
      <h1>{person}'s score: {score}</h1>
      <button onClick={() => setScore(score + 1)}>
        Add one
      </button>
    </div>
  );
}
- 처음에는
isPlayerA가true입니다. 따라서 첫 번째 자리에Counter가 있고 두 번째 자리는 비어있습니다. - ”Next player”를 클릭하면 첫 번째 자리는 비워지고 두 번째 자리에
Counter가 옵니다.
Initial state
Clicking “next”
Clicking “next” again
각
Counter의 State는 DOM에서 지워질 때마다 제거됩니다. 이것이 버튼을 누를 때마다 초기화되는 이유입니다.
이 방법은 같은 자리에 적은 수의 독립된 컴포넌트만을 가지고 있을 때 편리합니다. 이 예시에서는 두 개밖에 없기 때문에 JSX에서 각각 렌더링하기 번거롭지 않습니다.
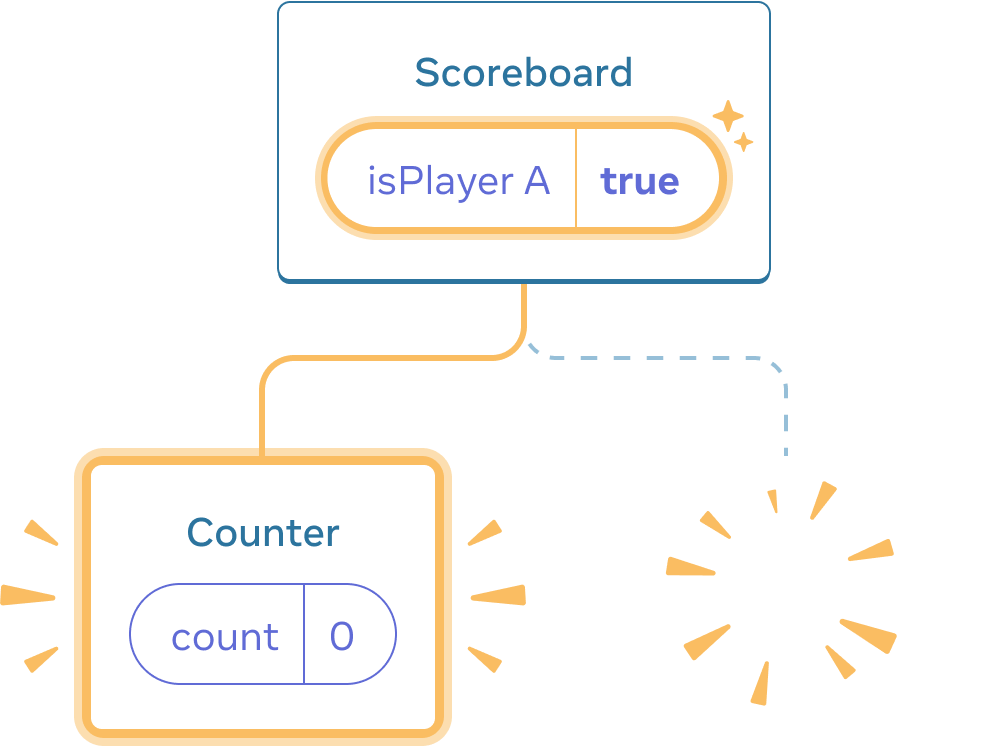
선택지 2: key를 이용해 State를 초기화하기
State를 초기화하는 좀 더 일반적인 방법이 또 있습니다.
배열을 렌더링할 때 key를 봤을 것입니다. key는 배열을 위한 것만은 아닙니다! React가 컴포넌트를 구별할 수 있도록 key를 사용할 수도 있습니다. 기본적으로 React는 컴포넌트를 구별하기 위해 부모 안에서의 순서(“첫 번째 카운터”, “두 번째 카운터”)를 이용합니다. 그러나 key를 이용하면 React에게 단지 첫 번째 카운터나 두 번째 카운터가 아니라 특정한 카운터라고 말해줄 수 있습니다. 예를 들면 Taylor의 카운터처럼요. 이렇게 트리 어디에서 나타나든 React는 Taylor의 카운터라는 것을 알 수 있습니다.
다음 예시에서 두 <Counter />는 JSX에서 같은 위치에 나타나지만, State를 공유하지는 않습니다.
import { useState } from 'react';

export default function Scoreboard() {
  const [isPlayerA, setIsPlayerA] = useState(true);
  return (
    <div>
      {isPlayerA ? (
        <Counter key="Taylor" person="Taylor" />
      ) : (
        <Counter key="Sarah" person="Sarah" />
      )}
      <button onClick={() => {
        setIsPlayerA(!isPlayerA);
      }}>
        Next player!
      </button>
    </div>
  );
}

function Counter({ person }) {
  const [score, setScore] = useState(0);
  const [hover, setHover] = useState(false);

  let className = 'counter';
  if (hover) {
    className += ' hover';
  }

  return (
    <div
      className={className}
      onPointerEnter={() => setHover(true)}
      onPointerLeave={() => setHover(false)}
    >
      <h1>{person}'s score: {score}</h1>
      <button onClick={() => setScore(score + 1)}>
        Add one
      </button>
    </div>
  );
}
Taylor와 Sarah를 바꾸지만, State를 유지하지는 않습니다. 당신이 다른 key를 주었기 때문이죠.
{isPlayerA ? (
  <Counter key="Taylor" person="Taylor" />
) : (
  <Counter key="Sarah" person="Sarah" />
)}key를 명시하면 React는 부모 내에서의 순서 대신에 key 자체를 위치의 일부로 사용합니다. 이것이 컴포넌트를 JSX에서 같은 자리에 렌더링하지만 React 관점에서는 다른 카운터인 이유입니다. 결과적으로 그들은 절대 State를 공유하지 않습니다. 카운터가 화면에 나타날 때마다 State가 새로 만들어집니다. 그리고 카운터가 제거될 때 마다 State도 제거됩니다. 그들을 토글할 때마다 State가 계속 초기화됩니다.
key가 전역적으로 유일하지 않다는 것을 기억해야 합니다. key는 오직 부모 안에서만 자리를 명시합니다.
key를 이용해 폼을 초기화하기
key로 State를 초기화하는 것은 특히 폼을 다룰 때 유용합니다.
다음 채팅 앱에서 <Chat> 컴포넌트는 문자열 입력 State를 가지고 있습니다.
import { useState } from 'react';
import Chat from './Chat.js';
import ContactList from './ContactList.js';

export default function Messenger() {
  const [to, setTo] = useState(contacts[0]);
  return (
    <div>
      <ContactList
        contacts={contacts}
        selectedContact={to}
        onSelect={contact => setTo(contact)}
      />
      <Chat contact={to} />
    </div>
  )
}

const contacts = [
  { id: 0, name: 'Taylor', email: 'taylor@mail.com' },
  { id: 1, name: 'Alice', email: 'alice@mail.com' },
  { id: 2, name: 'Bob', email: 'bob@mail.com' }
];
입력란에 타이핑한 후에 “Alice”나 “Bob”을 눌러 다른 수신자를 선택해보세요. <Chat>이 트리의 같은 곳에서 렌더링되기 때문에 입력값이 유지되는 것을 볼 수 있습니다.
많은 앱에서 이런 동작을 원하겠지만 채팅 앱에서는 아닙니다! 사용자가 실수로 클릭해서 이미 입력한 내용을 잘못된 사람에게 보내는 것은 바람직하지 않습니다. 이것을 고치기 위해 key를 추가해봅시다.
<Chat key={to.id} contact={to} />이는 다른 수신자를 선택할 때 Chat 컴포넌트가 그 하위 트리에 있는 모든 State를 포함해서 처음부터 다시 생성되는 것을 보장해줍니다. React는 DOM 엘리먼트도 재사용하는 대신 다시 만들 것입니다.
이제 수신자를 바꿀 때마다 입력란이 비워지게 됩니다.
import { useState } from 'react';
import Chat from './Chat.js';
import ContactList from './ContactList.js';

export default function Messenger() {
  const [to, setTo] = useState(contacts[0]);
  return (
    <div>
      <ContactList
        contacts={contacts}
        selectedContact={to}
        onSelect={contact => setTo(contact)}
      />
      <Chat key={to.id} contact={to} />
    </div>
  )
}

const contacts = [
  { id: 0, name: 'Taylor', email: 'taylor@mail.com' },
  { id: 1, name: 'Alice', email: 'alice@mail.com' },
  { id: 2, name: 'Bob', email: 'bob@mail.com' }
];
자세히 살펴보기
실제 채팅 앱에서는 이전의 수신자를 선택했을 때 입력값이 복구되는 것을 원할 것입니다. 보이지 않는 컴포넌트의 State를 “살아 있게”하는 몇 가지 방법이 있습니다.
- 현재 채팅만 렌더링하는 대신 모든 채팅을 렌더링하고 CSS로 안 보이게 할 수 있습니다. 채팅은 트리에서 사라지지 않을 것이고 따라서 그들의 State는 유지됩니다. 이 방법은 간단한 UI에서 잘 작동합니다. 하지만 숨겨진 트리가 크고 많은 DOM 노드를 가지고 있다면 매우 느려질 것입니다.
- State를 상위로 올리고 각 수신자의 임시 메시지를 부모 컴포넌트에 가지고 있을 수 있습니다. 이 방법에서 부모가 중요한 정보를 가지고 있기 때문에 자식 컴포넌트가 제거되어도 상관이 없습니다. 이것이 가장 일반적인 해법입니다.
- React State 이외의 다른 저장소를 이용할 수도 있습니다. 예를 들어 사용자가 페이지를 실수로 닫아도 메시지를 유지하고 싶을 수도 있습니다. 이때
localStorage에 메시지를 저장하고 이를 이용해Chat컴포넌트를 초기화할 수 있습니다.
어떤 방법을 선택하더라도 Alice와의 채팅은 Bob과의 채팅과 개념상 구별되기 때문에 현재 수신자를 기반으로 <Chat> 트리에 key를 주는 것이 타당합니다.
요약
- React는 같은 컴포넌트가 같은 자리에 렌더링되는 한 State를 유지합니다.
- State는 JSX 태그에 저장되지 않습니다. State는 JSX으로 만든 트리 위치와 연관됩니다.
- 컴포넌트에 다른 key를 주어서 그 하위 트리를 초기화하도록 강제할 수 있습니다.
- 중첩해서 컴포넌트를 정의하면 원치 않게 State가 초기화될 수 있기 때문에 그렇게 하지 마세요.
챌린지 1 of 5: 입력 문자열이 사라지는 것 고치기
이 예시에서 버튼을 누르면 메시지를 보여줍니다. 하지만 버튼을 누르는 것은 또한 원치 않게 State를 초기화합니다. 왜 이런 현상이 일어날까요? 버튼을 눌러도 입력 문자열이 초기화되지 않도록 고쳐보세요.
import { useState } from 'react';

export default function App() {
  const [showHint, setShowHint] = useState(false);
  if (showHint) {
    return (
      <div>
        <p><i>Hint: Your favorite city?</i></p>
        <Form />
        <button onClick={() => {
          setShowHint(false);
        }}>Hide hint</button>
      </div>
    );
  }
  return (
    <div>
      <Form />
      <button onClick={() => {
        setShowHint(true);
      }}>Show hint</button>
    </div>
  );
}

function Form() {
  const [text, setText] = useState('');
  return (
    <textarea
      value={text}
      onChange={e => setText(e.target.value)}
    />
  );
}