Context를 사용해 데이터를 깊게 전달하기
보통의 경우 부모 컴포넌트에서 자식 컴포넌트로 props를 통해 정보를 전달합니다. 그러나 중간에 많은 컴포넌트를 거쳐야 하거나, 애플리케이션의 많은 컴포넌트에서 동일한 정보가 필요한 경우에는 props를 전달하는 것이 번거롭고 불편할 수 있습니다. Context는 부모 컴포넌트가 트리 아래에 있는 모든 컴포넌트에 깊이에 상관없이 정보를 명시적으로 props를 통해 전달하지 않고도 사용할 수 있게 해줍니다.
학습 내용
- ”Prop drilling” 이란?
- Context로 반복적인 prop 전달 대체하기
- Context의 일반적인 사용 사례
- Context의 일반적인 대안
Props 전달하기의 문제점
Props 전달하기는 UI 트리를 통해 해당 데이터를 사용하는 컴포넌트에 명시적으로 데이터를 전달하는 훌륭한 방법입니다.
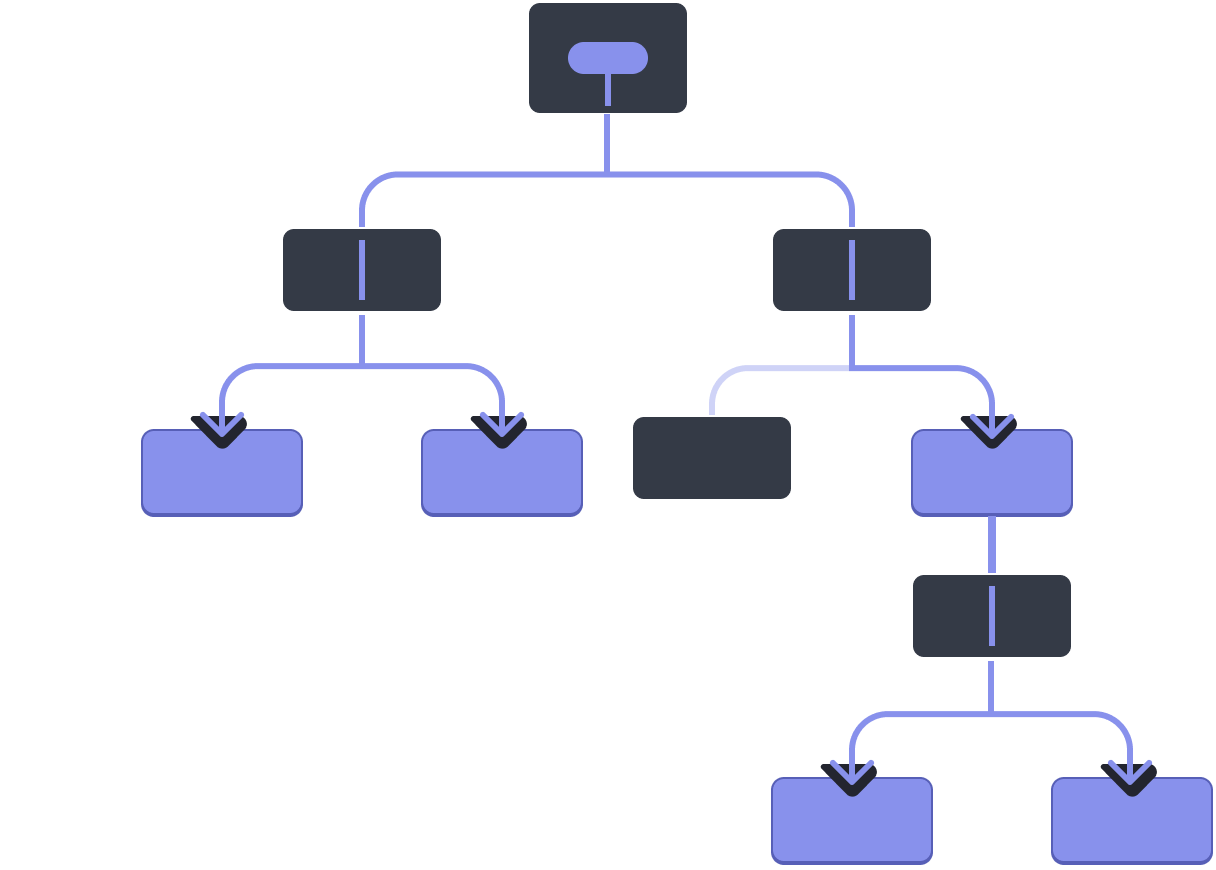
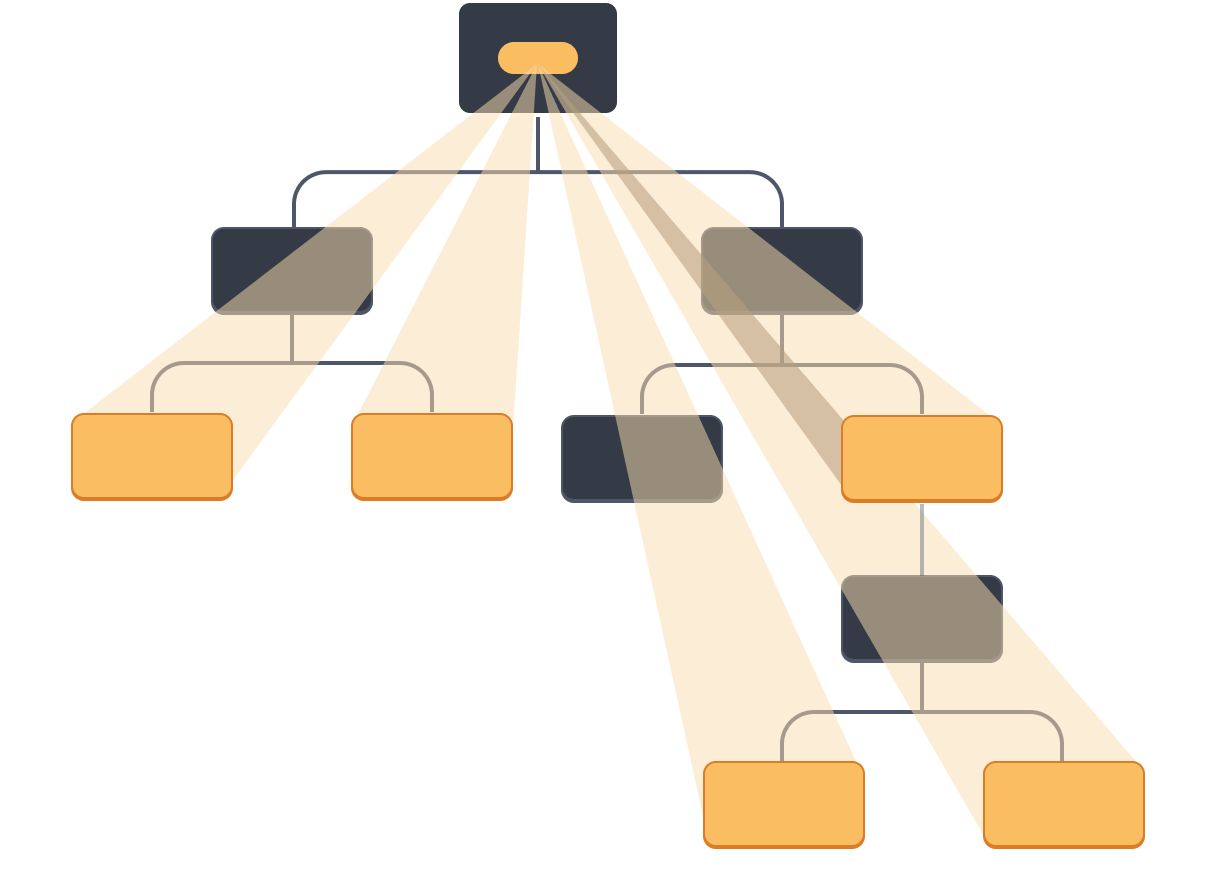
하지만 이 방식은 어떤 prop을 트리를 통해 깊이 전해줘야 하거나, 많은 컴포넌트에서 같은 prop이 필요한 경우에 장황하고 불편할 수 있습니다. 데이터가 필요한 여러 컴포넌트의 가장 가까운 공통 조상은 트리 상 높이 위치할 수 있고 그렇게 높게까지 state를 끌어올리는 것은 “Prop drilling”이라는 상황을 초래할 수 있습니다.
State 끌어올리기
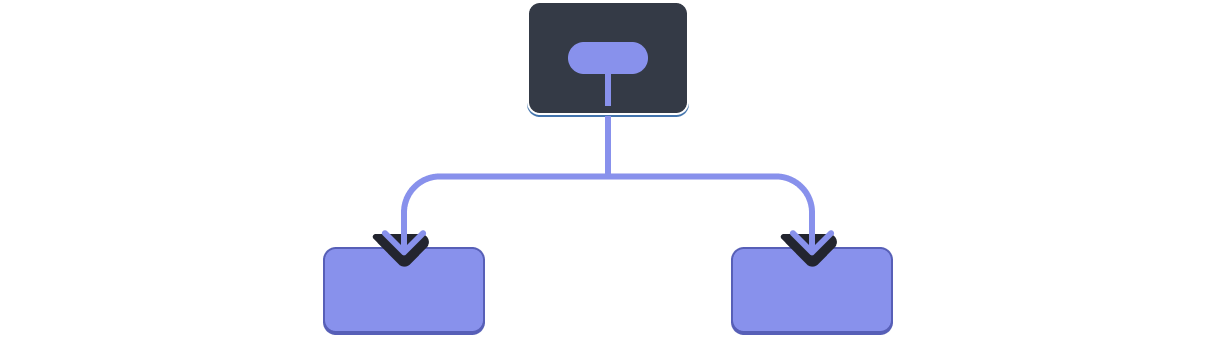

Prop drilling

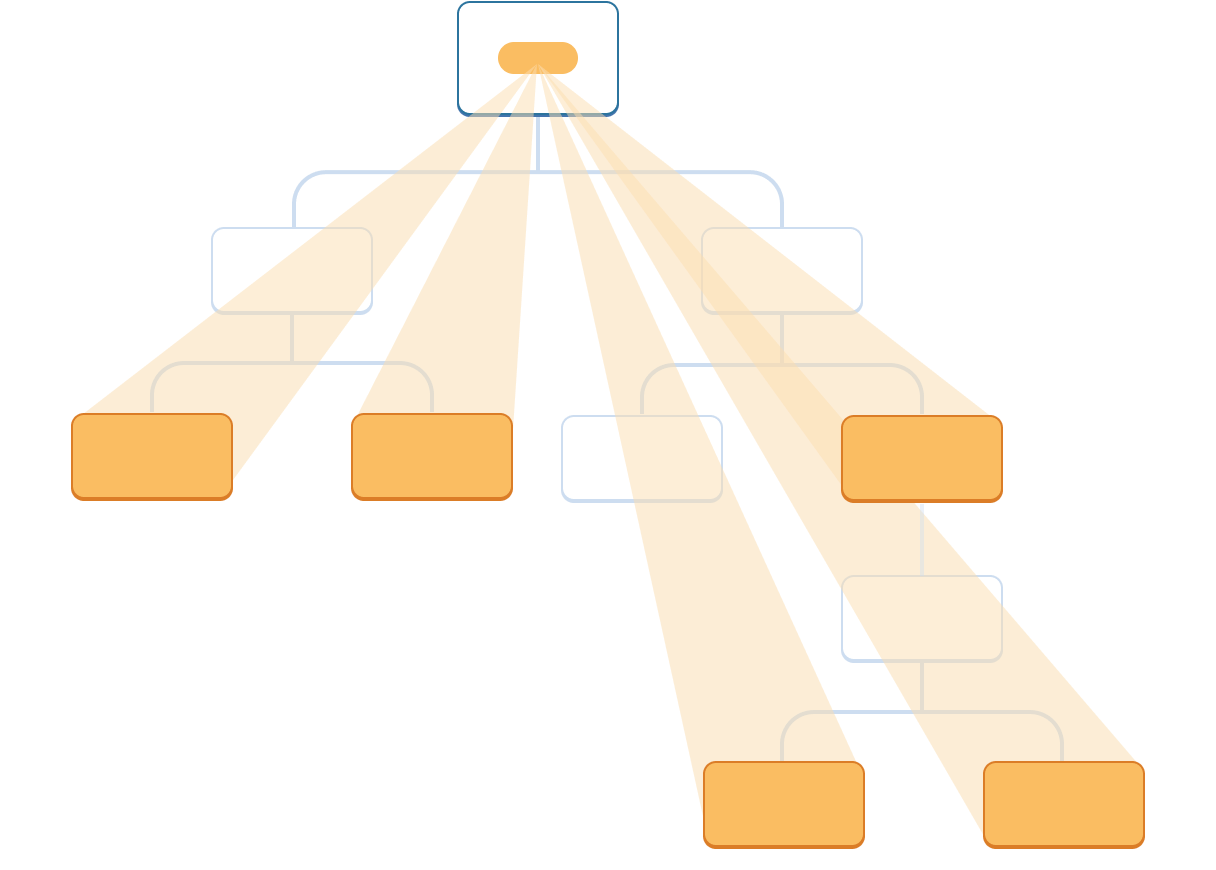
데이터를 사용할 트리의 내부 컴포넌트에 props를 전달하는 대신 “순간이동”시킬 방법이 있다면 좋지 않을까요? React의 context를 사용하면 됩니다!
Context: Props 전달하기의 대안
Context는 부모 컴포넌트가 그 아래의 트리 전체에 데이터를 전달할 수 있도록 해줍니다. Context에는 많은 용도가 있습니다. 하나의 예시로 다음의 크기 조정을 위해 level을 받는 Heading 컴포넌트를 보세요.
import Heading from './Heading.js';
import Section from './Section.js';

export default function Page() {
  return (
    <Section>
      <Heading level={1}>Title</Heading>
      <Heading level={2}>Heading</Heading>
      <Heading level={3}>Sub-heading</Heading>
      <Heading level={4}>Sub-sub-heading</Heading>
      <Heading level={5}>Sub-sub-sub-heading</Heading>
      <Heading level={6}>Sub-sub-sub-sub-heading</Heading>
    </Section>
  );
}
같은 Section 내의 여러 제목이 항상 동일한 크기를 가져야 한다고 가정해 봅시다.
import Heading from './Heading.js';
import Section from './Section.js';

export default function Page() {
  return (
    <Section>
      <Heading level={1}>Title</Heading>
      <Section>
        <Heading level={2}>Heading</Heading>
        <Heading level={2}>Heading</Heading>
        <Heading level={2}>Heading</Heading>
        <Section>
          <Heading level={3}>Sub-heading</Heading>
          <Heading level={3}>Sub-heading</Heading>
          <Heading level={3}>Sub-heading</Heading>
          <Section>
            <Heading level={4}>Sub-sub-heading</Heading>
            <Heading level={4}>Sub-sub-heading</Heading>
            <Heading level={4}>Sub-sub-heading</Heading>
          </Section>
        </Section>
      </Section>
    </Section>
  );
}
지금은 각각의 <Heading>에 level prop을 전달하고 있습니다.
<Section>
  <Heading level={3}>About</Heading>
  <Heading level={3}>Photos</Heading>
  <Heading level={3}>Videos</Heading>
</Section>
<Section> 컴포넌트에 level prop을 전달해 이를 <Heading>에서 제거할 수 있으면 좋겠네요. 이렇게 하면 같은 섹션의 모든 제목이 동일한 크기를 갖도록 지정할 수 있습니다.
<Section level={3}>
  <Heading>About</Heading>
  <Heading>Photos</Heading>
  <Heading>Videos</Heading>
</Section>
하지만 어떻게 <Heading> 컴포넌트가 가장 가까운 <Section>의 레벨을 알 수 있을까요? 그렇게 하려면 자식에게 트리 위 어딘가에 있는 데이터를 “요청하는” 방법이 필요합니다.
Props만으로는 불가능합니다. 여기서부터 context가 활약하기 시작합니다. 다음의 세 단계로 진행됩니다.
- Context를 생성하세요. (제목 레벨을 위한 것이므로
LevelContext라고 이름 지어봅시다.) - 데이터가 필요한 컴포넌트에서 context를 사용하세요. (
Heading에서는LevelContext를 사용합니다.) - 데이터를 지정하는 컴포넌트에서 context를 제공하세요. (
Section에서는LevelContext를 제공합니다.)
Context는 부모가 트리 내부 전체에, 심지어 멀리 떨어진 컴포넌트에조차 어떤 데이터를 제공할 수 있도록 합니다.
Context를 가까운 자식 컴포넌트에서 사용하기


Context를 먼 자식 컴포넌트에서 사용하기
1단계: Context 생성하기
먼저 context를 만들어야 합니다. 컴포넌트에서 사용할 수 있도록 파일에서 내보내야 합니다.
import { createContext } from 'react';

export const LevelContext = createContext(1);
createContext의 유일한 인자는 기본값입니다. 여기서 1은 가장 큰 제목 레벨을 나타내지만 모든 종류의 값을(객체까지) 전달할 수 있습니다. 다음 단계에서 기본값이 얼마나 중요한지 알게 됩니다.
2단계: Context 사용하기
React에서 useContext Hook과 생성한 Context를 가져옵니다.
import { useContext } from 'react';
import { LevelContext } from './LevelContext.js';
지금은 Heading 컴포넌트가 level을 props에서 읽어옵니다.
export default function Heading({ level, children }) {
  // ...
}levelprop을 제거하고 대신 위에서 가져온 context인 LevelContext에서 값을 읽도록 합니다.
export default function Heading({ children }) {
  const level = useContext(LevelContext);
  // ...
}useContext는 Hook입니다. useState, useReducer와 같이 Hook은 React 컴포넌트의 바로 안에서만 호출할 수 있습니다. (반복문이나 조건문 내부가 아닙니다.) useContext는 React에게 Heading 컴포넌트가 LevelContext를 읽으려 한다고 알려줍니다.
이제 Heading 컴포넌트는 level prop을 갖지 않습니다. 이제는 JSX에서 다음과 같이 Heading에 level prop을 전달할 필요가 없습니다.
<Section>
  <Heading level={4}>Sub-sub-heading</Heading>
  <Heading level={4}>Sub-sub-heading</Heading>
  <Heading level={4}>Sub-sub-heading</Heading>
</Section>Section이 대신 level을 받도록 JSX를 업데이트합니다.
<Section level={4}>
  <Heading>Sub-sub-heading</Heading>
  <Heading>Sub-sub-heading</Heading>
  <Heading>Sub-sub-heading</Heading>
</Section>
다시 한번 알려드리자면, 동작하도록 만들려던 마크업은 다음과 같습니다.
import Heading from './Heading.js';
import Section from './Section.js';

export default function Page() {
  return (
    <Section level={1}>
      <Heading>Title</Heading>
      <Section level={2}>
        <Heading>Heading</Heading>
        <Heading>Heading</Heading>
        <Heading>Heading</Heading>
        <Section level={3}>
          <Heading>Sub-heading</Heading>
          <Heading>Sub-heading</Heading>
          <Heading>Sub-heading</Heading>
          <Section level={4}>
            <Heading>Sub-sub-heading</Heading>
            <Heading>Sub-sub-heading</Heading>
            <Heading>Sub-sub-heading</Heading>
          </Section>
        </Section>
      </Section>
    </Section>
  );
}
이 예시는 아직 잘 작동하지 않습니다! Context를 사용하고 있지만, 아직 제공하지 않았기 때문에 모든 제목의 크기가 동일합니다. React가 어디서 값을 가져와야 할지 모르기 때문이죠.
Context를 제공하지 않으면 React는 이전 단계에서 지정한 기본값을 사용합니다. 이 예시에서는 1을 createContext의 인수로 지정했으므로 useContext(LevelContext)가 1을 반환하고 모든 제목을 <h1>로 설정합니다. 이 문제를 각각의 Section이 고유한 context를 제공하도록 하여 해결합시다.
3단계: Context 제공하기
Section 컴포넌트는 자식들을 렌더링하고 있습니다.
export default function Section({ children }) {
  return (
    <section className="section">
      {children}
    </section>
  );
}LevelContext를 자식들에게 제공하기 위해 context provider로 감싸줍니다.
import { LevelContext } from './LevelContext.js';

export default function Section({ level, children }) {
  return (
    <section className="section">
      <LevelContext value={level}>
        {children}
      </LevelContext>
    </section>
  );
}
이것은 React에게 <Section> 내의 어떤 컴포넌트가 LevelContext를 요구하면 level을 주라고 알려줍니다. 컴포넌트는 그 위에 있는 UI 트리에서 가장 가까운 <LevelContext>의 값을 사용합니다.
import Heading from './Heading.js';
import Section from './Section.js';

export default function Page() {
  return (
    <Section level={1}>
      <Heading>Title</Heading>
      <Section level={2}>
        <Heading>Heading</Heading>
        <Heading>Heading</Heading>
        <Heading>Heading</Heading>
        <Section level={3}>
          <Heading>Sub-heading</Heading>
          <Heading>Sub-heading</Heading>
          <Heading>Sub-heading</Heading>
          <Section level={4}>
            <Heading>Sub-sub-heading</Heading>
            <Heading>Sub-sub-heading</Heading>
            <Heading>Sub-sub-heading</Heading>
          </Section>
        </Section>
      </Section>
    </Section>
  );
}
기존 코드와 동일한 결과이지만 level prop을 각 Heading 컴포넌트에 전달할 필요는 없습니다! 대신 위의 가장 가까운 Section에게 제목 레벨을 “확인”합니다.
levelprop 을<Section>에 전달합니다.Section은 자식을<LevelContext value={level}>로 감싸줍니다.Heading은useContext(LevelContext)를 사용해 가장 근처의LevelContext의 값을 요청합니다.
같은 컴포넌트에서 context를 사용하며 제공하기
지금은 각각의 섹션에 level을 수동으로 지정해야 합니다.
export default function Page() {
  return (
    <Section level={1}>
      ...
      <Section level={2}>
        ...
        <Section level={3}>
          ...
Context를 통해 위의 컴포넌트에서 정보를 읽을 수 있으므로 각 Section은 위의 Section에서 level을 읽고 자동으로 level + 1을 아래로 전달할 수 있습니다. 방법은 다음과 같습니다.
import { useContext } from 'react';
import { LevelContext } from './LevelContext.js';

export default function Section({ children }) {
  const level = useContext(LevelContext);
  return (
    <section className="section">
      <LevelContext value={level + 1}>
        {children}
      </LevelContext>
    </section>
  );
}
이렇게 바꾸면 <Section>과 <Heading> 둘 모두에 level을 전달할 필요가 없습니다.
import Heading from './Heading.js';
import Section from './Section.js';

export default function Page() {
  return (
    <Section>
      <Heading>Title</Heading>
      <Section>
        <Heading>Heading</Heading>
        <Heading>Heading</Heading>
        <Heading>Heading</Heading>
        <Section>
          <Heading>Sub-heading</Heading>
          <Heading>Sub-heading</Heading>
          <Heading>Sub-heading</Heading>
          <Section>
            <Heading>Sub-sub-heading</Heading>
            <Heading>Sub-sub-heading</Heading>
            <Heading>Sub-sub-heading</Heading>
          </Section>
        </Section>
      </Section>
    </Section>
  );
}
이제 Heading과 Section 모두 자신들이 얼마나 “깊이” 있는지 확인하기 위해 LevelContext를 읽습니다. 그리고 Section은 그 안에 있는 어떤 것이든 “더 깊은” 레벨이라는 것을 명시하기 위해 자식들을 LevelContext로 감싸고 있습니다.
Context로 중간 컴포넌트 지나치기
Context를 제공하는 컴포넌트와 context를 사용하는 컴포넌트 사이에 원하는 만큼의 컴포넌트를 삽입할 수 있습니다. 여기에는 <div>와 같은 기본 컴포넌트와 직접 만들 수 있는 컴포넌트가 모두 포함됩니다.
이 예시에서는 점선 테두리를 가진 동일한 Post 컴포넌트가 두 가지 다른 중첩 레벨로 렌더링 됩니다. 내부의 <Heading>이 가장 가까운 <Section>에서 자동으로 레벨을 가져오는 것에 주목하세요.
import Heading from './Heading.js';
import Section from './Section.js';

export default function ProfilePage() {
  return (
    <Section>
      <Heading>My Profile</Heading>
      <Post
        title="Hello traveller!"
        body="Read about my adventures."
      />
      <AllPosts />
    </Section>
  );
}

function AllPosts() {
  return (
    <Section>
      <Heading>Posts</Heading>
      <RecentPosts />
    </Section>
  );
}

function RecentPosts() {
  return (
    <Section>
      <Heading>Recent Posts</Heading>
      <Post
        title="Flavors of Lisbon"
        body="...those pastéis de nata!"
      />
      <Post
        title="Buenos Aires in the rhythm of tango"
        body="I loved it!"
      />
    </Section>
  );
}

function Post({ title, body }) {
  return (
    <Section isFancy={true}>
      <Heading>
        {title}
      </Heading>
      <p><i>{body}</i></p>
    </Section>
  );
}
이 작업을 위해 아무것도 하지 않아도 됩니다. Section은 트리에 대한 context를 지정하므로 아무 곳에나 <Heading>을 삽입할 수 있으며 알맞은 크기를 가집니다. 위의 샌드박스에서 한 번 시도해보세요!
Context를 사용하면 “주변에 적응”하고 렌더링 되는 위치(또는 어떤 context)에 따라 자신을 다르게 표시하는 컴포넌트를 작성할 수 있습니다.
Context의 작동 방식은 CSS 속성 상속을 연상시킵니다. CSS에서 <div>에 대해 color: blue를 지정할 수 있으며, 중간에 있는 다른 DOM 노드가 color: green으로 재정의하지 않는 한 그 안의 모든 DOM 노드가 그 색상을 상속합니다. 마찬가지로, React에서 위에서 가져온 어떤 context를 재정의하는 유일한 방법은 자식들을 다른 값을 가진 context provider로 래핑하는 것입니다.
CSS에서 color와 background-color 같이 다른 속성들은 서로 영향을 주지 않습니다. <div>의 모든 color를 background-color에 영향을 미치지 않고 빨간색으로 지정할 수 있죠. 이처럼 서로 다른 React context는 영향을 주지 않습니다. createContext()로 만든 각각의 context는 완벽히 분리되어 있고 특정 context를 사용 및 제공하는 컴포넌트끼리 묶여 있습니다. 하나의 컴포넌트는 문제없이 많은 다른 context를 사용하거나 제공할 수 있습니다.
Context를 사용하기 전에 고려할 것
Context는 사용하기에 꽤 유혹적입니다. 그러나 이는 또한 남용하기 쉽다는 의미이기도 합니다. 어떤 props를 여러 레벨 깊이로 전달해야 한다고 해서 해당 정보를 context에 넣어야 하는 것은 아닙니다.
다음은 context를 사용하기 전 고려해볼 몇 가지 대안들입니다.
- Props 전달하기로 시작하기. 사소한 컴포넌트들이 아니라면 여러 개의 props가 여러 컴포넌트를 거쳐 가는 것은 그리 이상한 일이 아닙니다. 힘든 일처럼 느껴질 수 있지만 어떤 컴포넌트가 어떤 데이터를 사용하는지 매우 명확히 해줍니다. 데이터의 흐름이 props를 통해 분명해져 코드를 유지보수 하기에도 좋습니다.
- 컴포넌트를 추출하고 JSX를
children으로 전달하기. 데이터를 사용하지 않는 많은 중간 컴포넌트 층을 통해 어떤 데이터를 전달하는 (더 아래로 보내기만 하는) 경우에는 컴포넌트를 추출하는 것을 잊은 경우가 많습니다. 예를 들어posts처럼 직접 사용하지 않는 props를<Layout posts={posts} />와 같이 전달할 수 있습니다. 대신Layout은children을 prop으로 받고<Layout><Posts posts={posts} /><Layout>을 렌더링하세요. 이렇게 하면 데이터를 지정하는 컴포넌트와 데이터가 필요한 컴포넌트 사이의 층수가 줄어듭니다.
만약 이 접근 방법들이 잘 맞지 않는다면 context를 고려해보세요.
Context 사용 예시
- 테마 지정하기: 사용자가 모양을 변경할 수 있는 애플리케이션의 경우에 (e.g. 다크 모드) context provider를 앱 최상단에 두고 시각적으로 조정이 필요한 컴포넌트에서 context를 사용할 수 있습니다.
- 현재 계정: 로그인한 사용자를 알아야 하는 컴포넌트가 많을 수 있습니다. Context에 놓으면 트리 어디에서나 편하게 알아낼 수 있습니다. 일부 애플리케이션에서는 동시에 여러 계정을 운영할 수도 있습니다. (e.g. 다른 사용자로 댓글을 남기는 경우.) 이런 경우에는 UI의 일부를 서로 다른 현재 계정 값을 가진 provider로 감싸 주는 것이 편리합니다.
- 라우팅: 대부분의 라우팅 솔루션은 현재 경로를 유지하기 위해 내부적으로 context를 사용합니다. 이것이 모든 링크의 활성화 여부를 “알 수 있는” 방법입니다. 라우터를 만든다면 같은 방식으로 하고 싶을 것입니다.
- 상태 관리: 애플리케이션이 커지면 결국 앱 상단에 수많은 state가 생기게 됩니다. 아래 멀리 떨어진 많은 컴포넌트가 그 값을 변경하고 싶어할 수 있습니다. 흔히 reducer를 context와 함께 사용하는 것은 복잡한 state를 관리하고 번거로운 작업 없이 멀리 있는 컴포넌트까지 값을 전달하는 방법입니다.
Context는 정적인 값으로 제한되지 않습니다. 다음 렌더링 시 다른 값을 준다면 React는 아래의 모든 컴포넌트에서 그 값을 갱신합니다. 이것은 context와 state가 자주 조합되는 이유입니다.
일반적으로 트리의 다른 부분에서 멀리 떨어져 있는 컴포넌트들이 같은 정보가 필요하다는 것은 context를 사용하기 좋다는 징조입니다.
요약
- Context는 컴포넌트가 트리 상 아래에 위치한 모든 곳에 데이터를 제공하도록 합니다.
- Context를 전달하려면 다음과 같습니다
export const MyContext = createContext(defaultValue)로 context를 생성하고 내보내세요.useContext(MyContext)Hook에 전달해 얼마나 깊이 있든 자식 컴포넌트가 읽을 수 있도록 합니다.- 자식을
<MyContext value={...}>로 감싸 부모로부터 context를 받도록 합니다.
- Context는 중간의 어떤 컴포넌트도 지나갈 수 있습니다.
- Context를 활용해 “주변에 적응하는” 컴포넌트를 작성할 수 있습니다.
- Context를 사용하기 전에 props를 전달하거나 JSX를
children으로 전달하는 것을 먼저 시도해보세요.
챌린지 1 of 1: Context로 prop drilling 대체하기
다음의 예시에서 체크 박스를 토글하는 것은 각각의 <PlaceImage>에 전달된 imageSize prop을 변경합니다. 체크 박스의 state는 App 컴포넌트의 최상단에서 가지고 있지만 <PlaceImage>에서 그 값을 알아야 합니다.
현재는 App이 imageSize를 List에 전달하면 또 Place에 전달하고 다시 PlaceImage에 전달하고 있습니다.imageSize prop을 제거하고 App 컴포넌트가 직접 PlaceImage에 값을 전달하도록 해봅시다.
Context를 Context.js에 선언합니다.
import { useState } from 'react';
import { places } from './data.js';
import { getImageUrl } from './utils.js';

export default function App() {
  const [isLarge, setIsLarge] = useState(false);
  const imageSize = isLarge ? 150 : 100;
  return (
    <>
      <label>
        <input
          type="checkbox"
          checked={isLarge}
          onChange={e => {
            setIsLarge(e.target.checked);
          }}
        />
        Use large images
      </label>
      <hr />
      <List imageSize={imageSize} />
    </>
  )
}

function List({ imageSize }) {
  const listItems = places.map(place =>
    <li key={place.id}>
      <Place
        place={place}
        imageSize={imageSize}
      />
    </li>
  );
  return <ul>{listItems}</ul>;
}

function Place({ place, imageSize }) {
  return (
    <>
      <PlaceImage
        place={place}
        imageSize={imageSize}
      />
      <p>
        <b>{place.name}</b>
        {': ' + place.description}
      </p>
    </>
  );
}

function PlaceImage({ place, imageSize }) {
  return (
    <img
      src={getImageUrl(place)}
      alt={place.name}
      width={imageSize}
      height={imageSize}
    />
  );
}